
Heuristics
Labeling functions
Labeling functions are the simplest concept of a heuristic. They consist of some Python code that labels the data according to some logic that the user can provide. This can be seen as transferring the domain expertise from concepts stored in a person's mind to explicit rules, which are human- and machine-readable.
Creating a labeling function
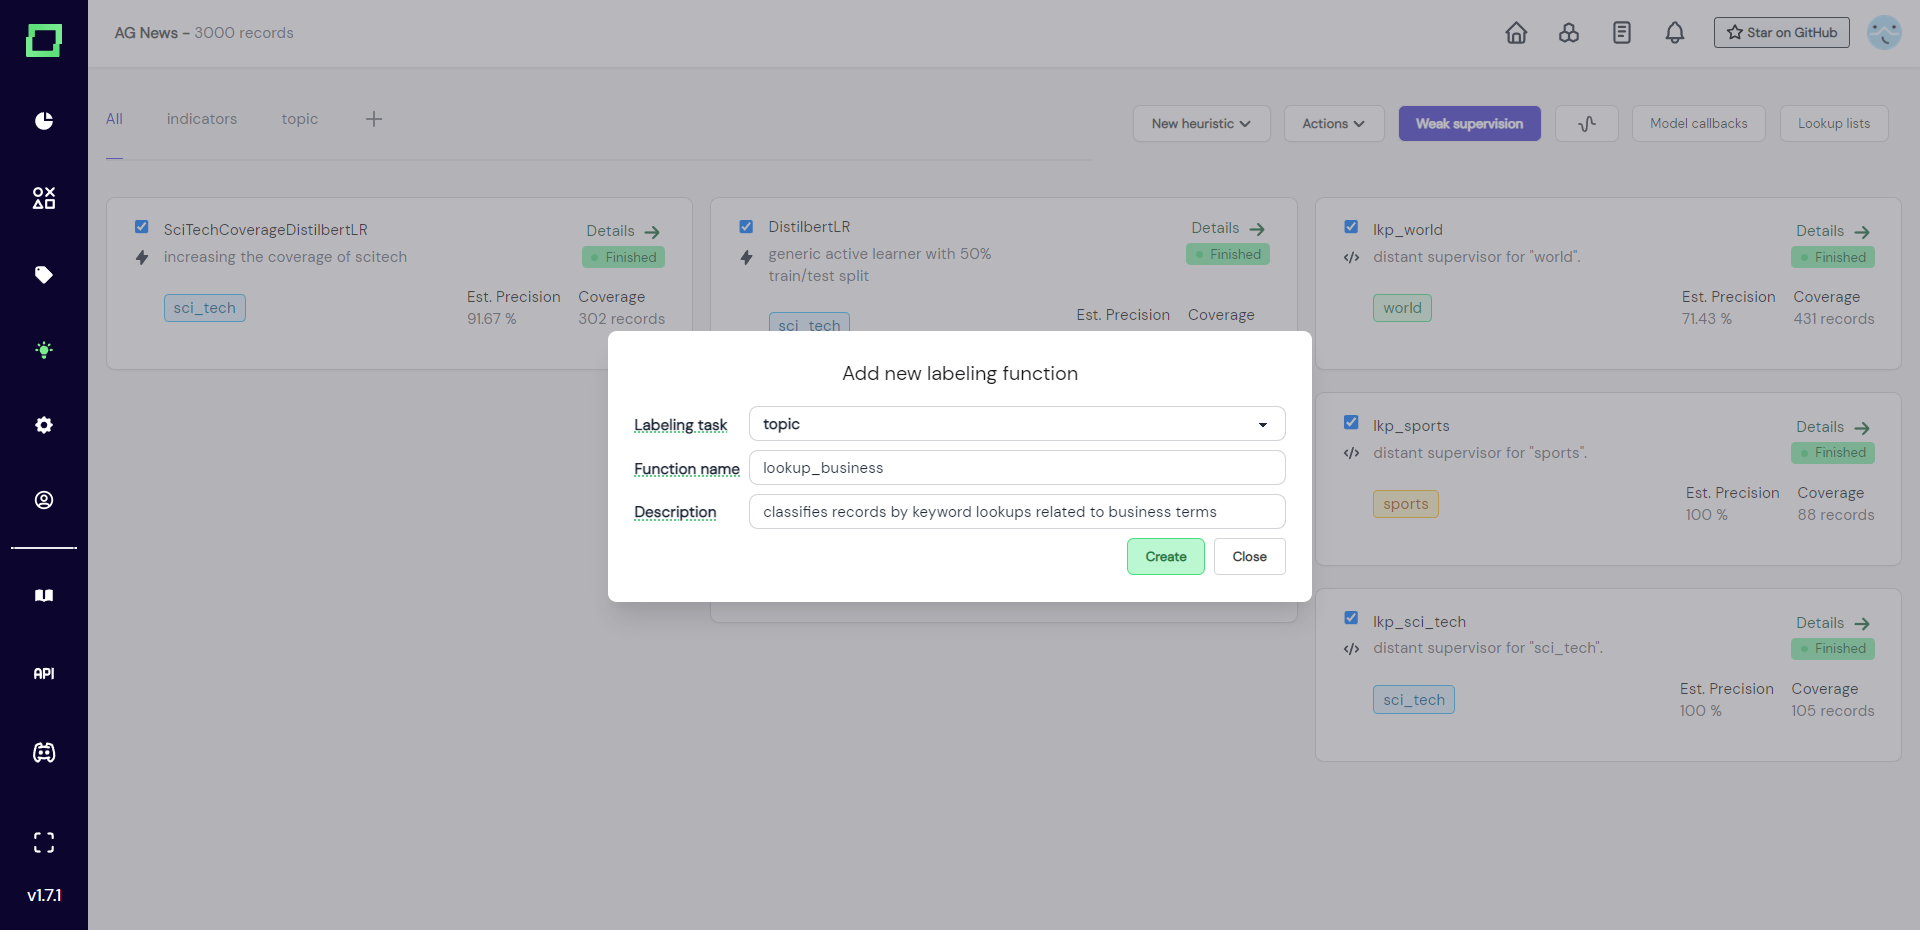
To create a labeling function simply navigate to the heuristics page and select "Labeling function" from the "New heuristic" button.

After that, a modal will appear where you need to select the labeling task that this heuristic is for and give the labeling function a unique name and an optional description. These selections are not finite and can be changed easily later.
After creation, you will be redirected to the details page of that labeling function, which is also accessible from the heuristics overview. Here, you have the option to start your labeling function from scratch or to "search in bricks". Bricks is our open-source content library that collects a lot of standard NLP tasks, e.g. language detection, sentiment analysis, or profanity detection. If you are interested in integrating a bricks module, please look at the bricks integration page.
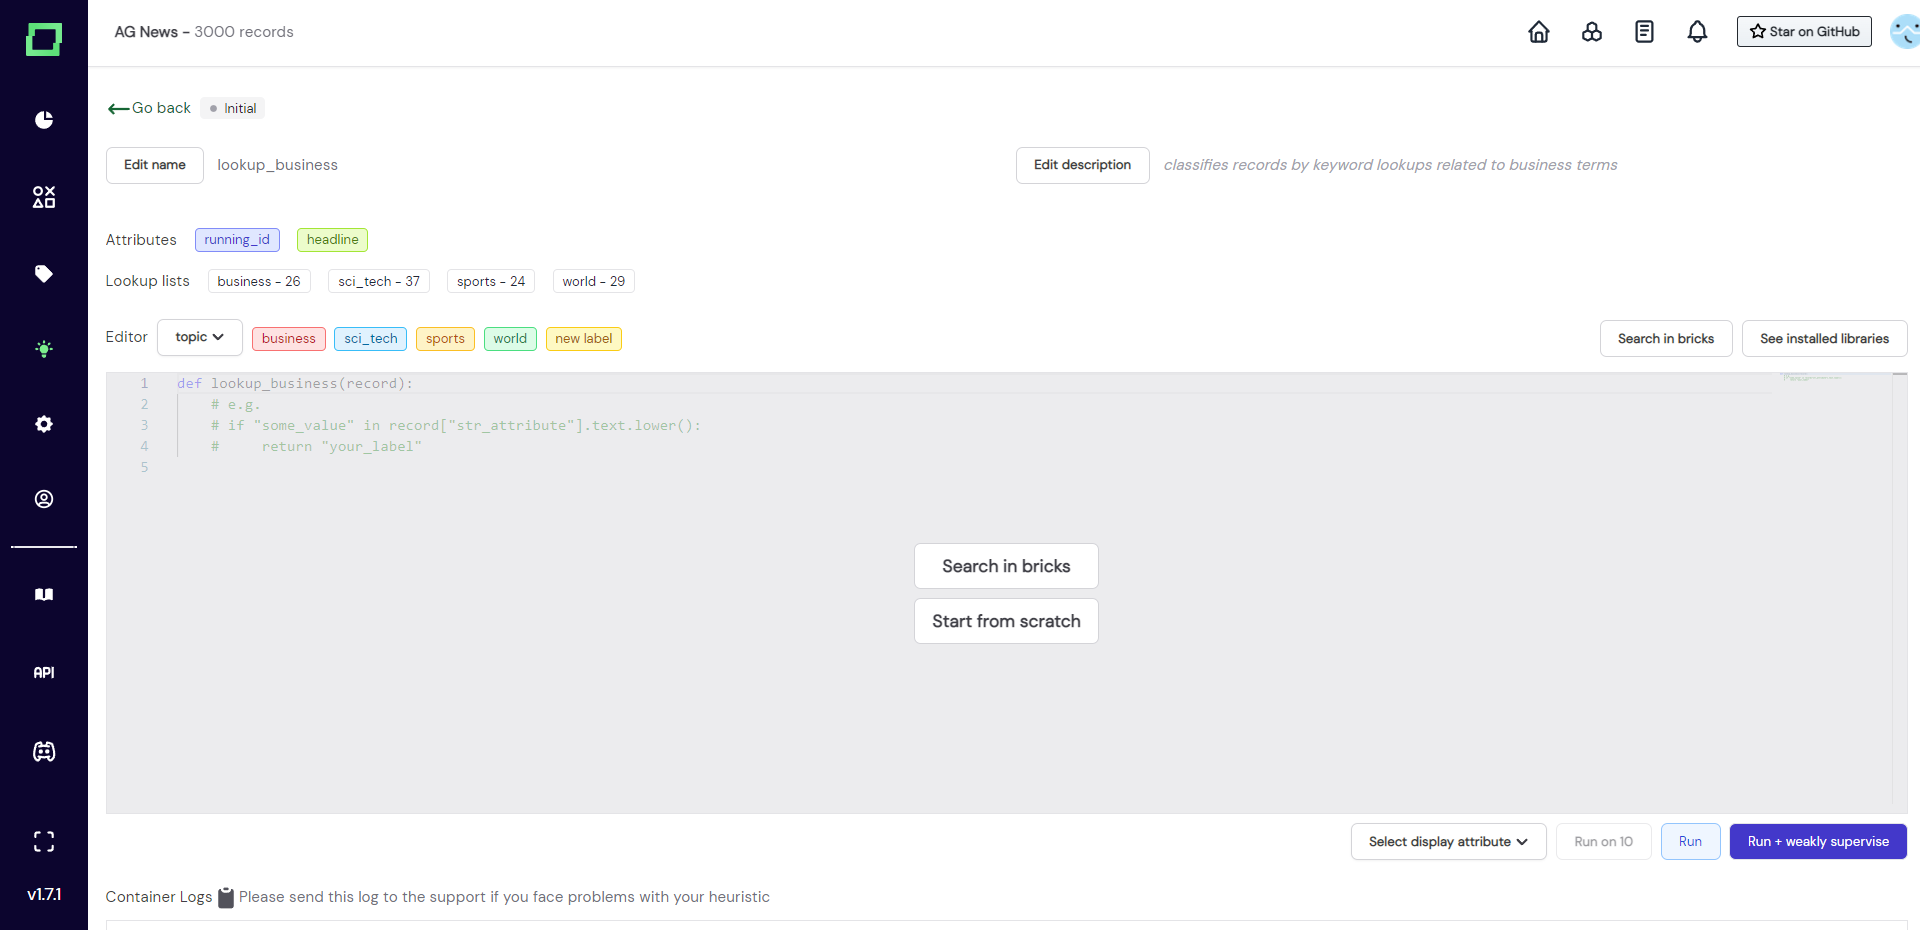
The next section will show you how to write a labeling function from scratch.
Writing a labeling function
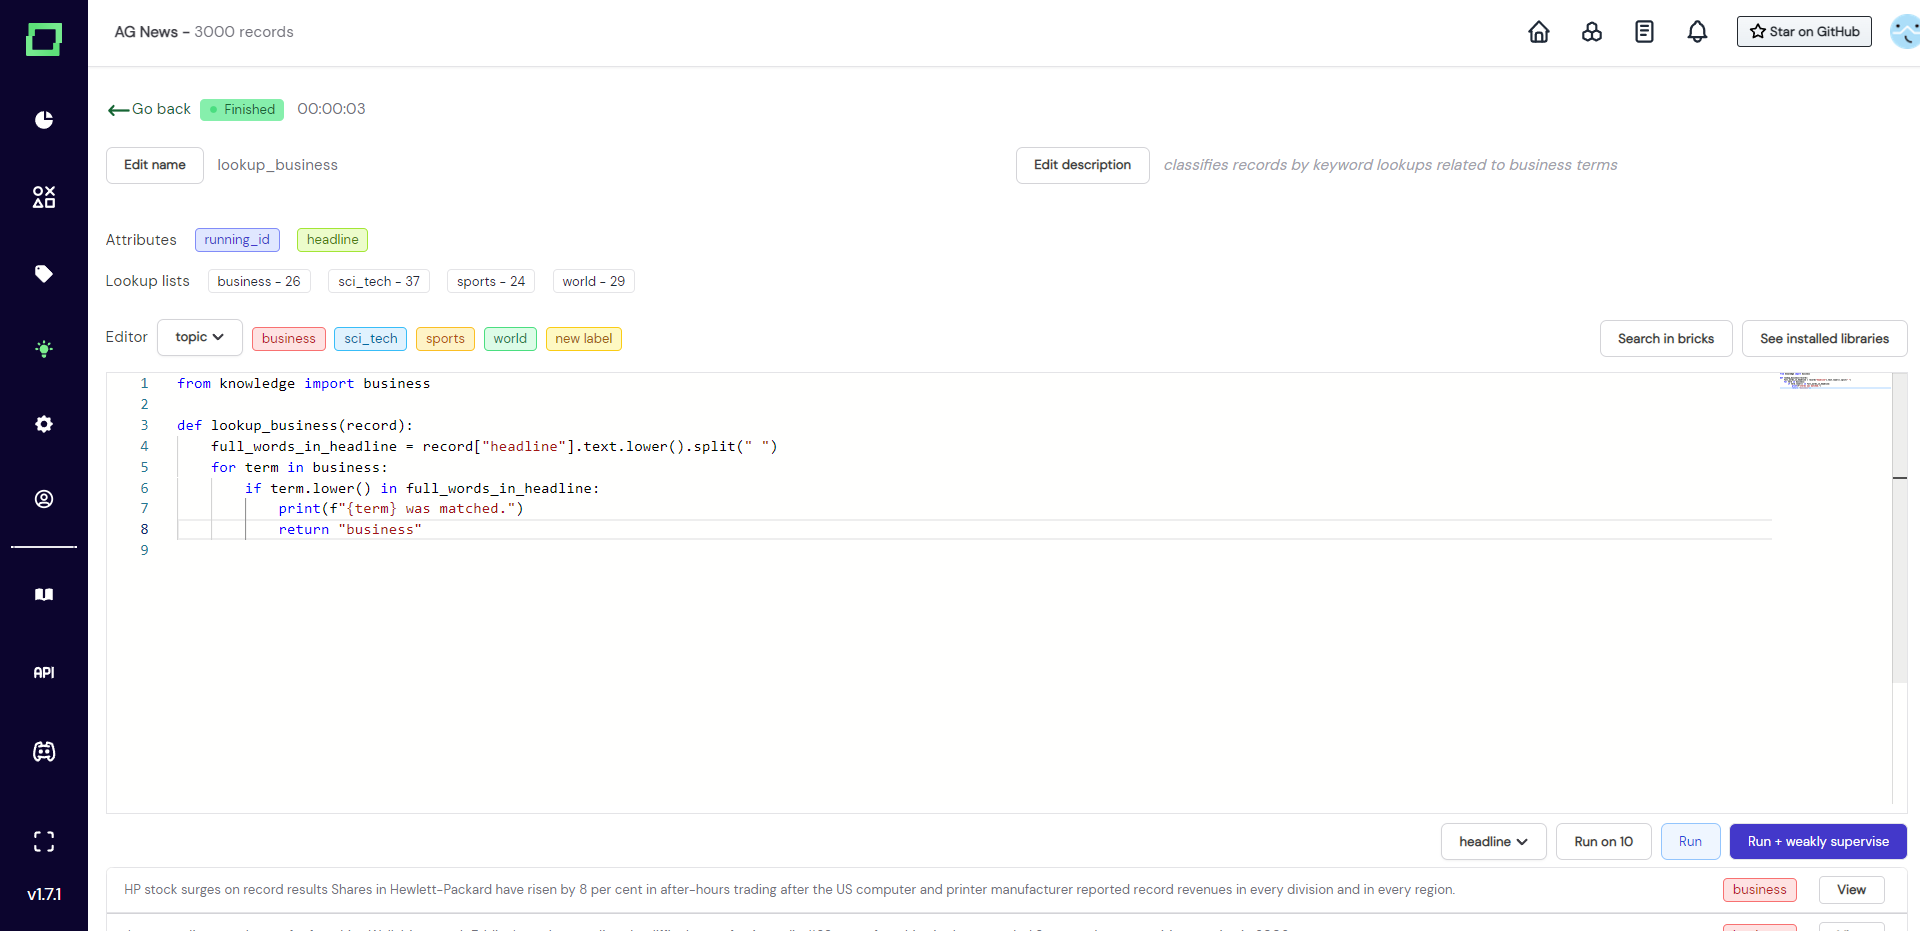
After creation, you will be redirected to the details page, which packs many features. For this section, we will be concentrating on the code editor.
Before we start coding, let's talk about the signature of the labeling function:
- The input
recordis a dictionary containing a single record with the attribute names as keys- as we tokenize text attributes, they won't be a simple string, but rather a spaCy Doc object (use
attribute.textfor the raw string) - the other attributes can be accessed directly, even categorical attributes
- as we tokenize text attributes, they won't be a simple string, but rather a spaCy Doc object (use
- The output will be different depending on the type of labeling task
- a classification task must have a
returnstatement that returns an existing label name as a string - an extraction task must have a
yieldstatement that follows the pattern ofyield YOUR_LABEL, span.start, span.endwhereYOUR_LABELalso is an existing label name as a string
- a classification task must have a
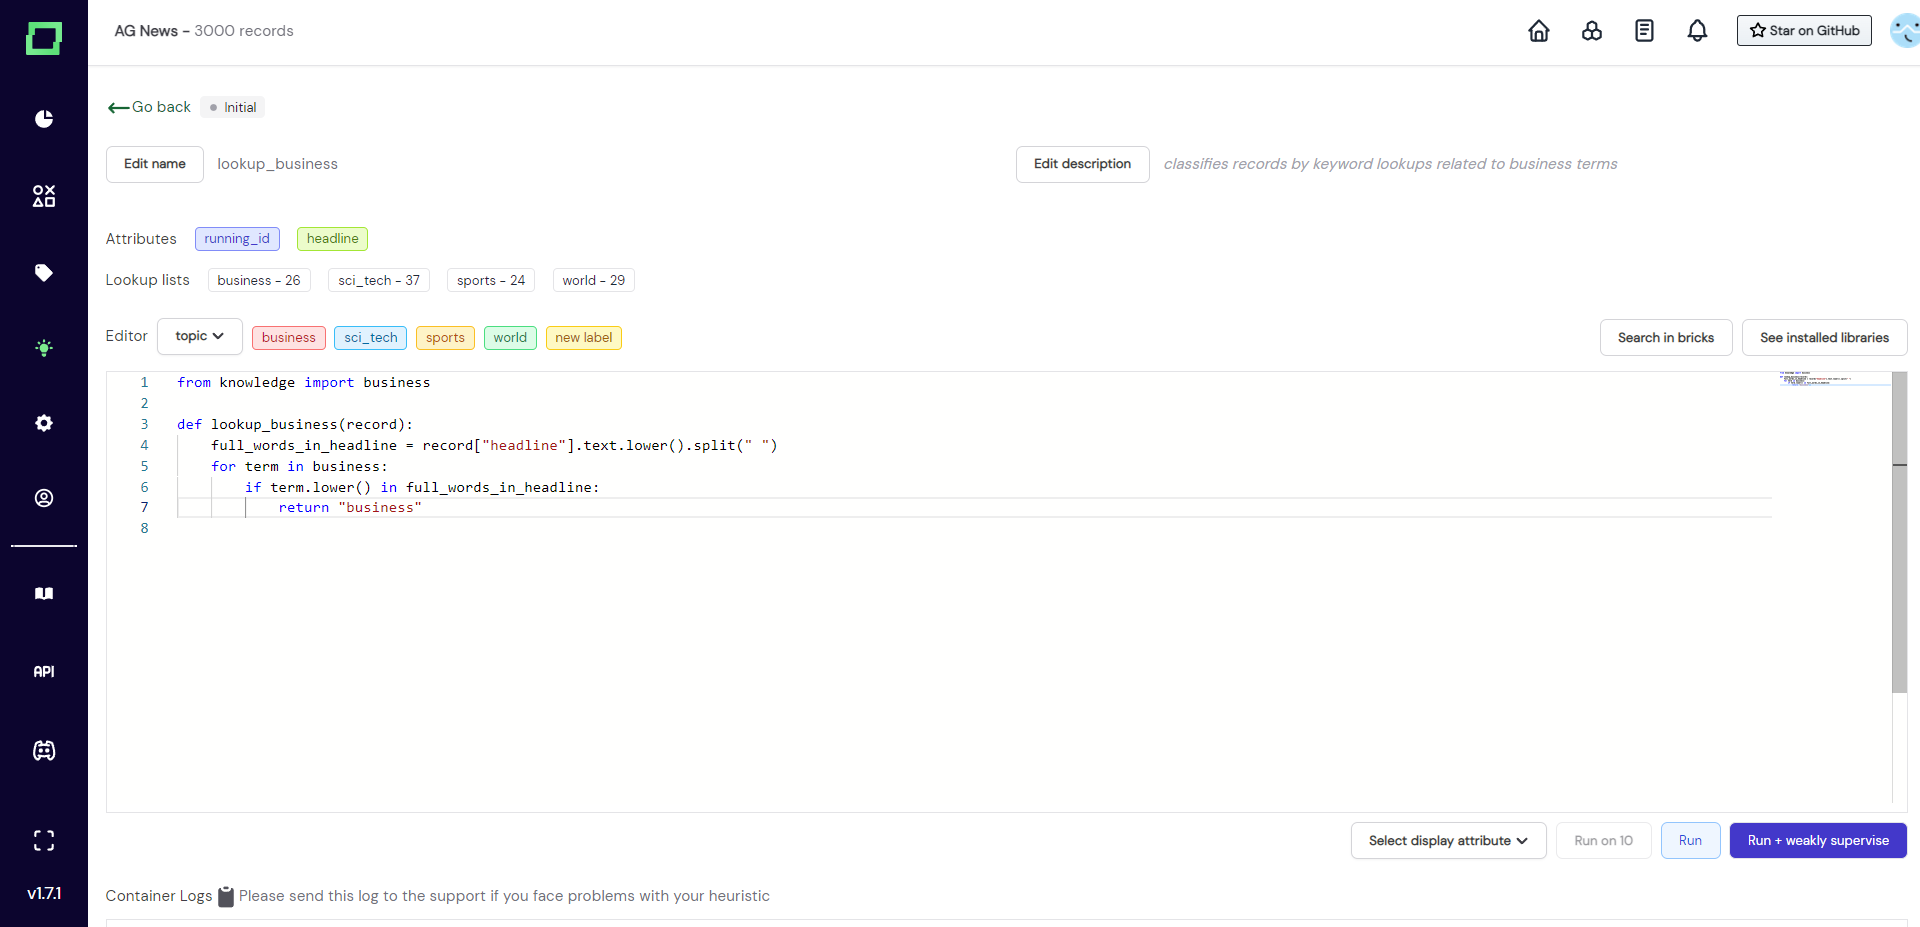
To write a labeling function, you just input your code into the code editor. Be aware that auto-save is always on! So if you plan to make big changes, either create a new labeling function or save the old code in a notepad.
Above the code editor, there are some quality-of-life features:
- Attributes: list of attributes that are available in your data. The colors of these buttons indicate the data type, hover over them for more details. They can also be pressed which copies the name to your clipboard - no more typos!
- Lookup lists: list of available lookup lists and the number of terms that are in them. Click them to copy the whole import statement to the clipboard.
- Editor: the dropdown right next to it defines the labeling task that the labeling function will be run on. Next to that are more colorful buttons that represent the available labels for that task. Click them to copy to the clipboard!
There are many pre-installed useful libraries, e.g. beautifulsoup4, nltk, spacy, and requests. You can check what libraries are installed by clicking the See installed libraries button on the top right corner just above the editor. You read that right, requests work within labeling functions! So you can also call outside APIs and save those predictions as a labeling function. Though, if you have a production model that you want to incorporate, we suggest using model callbacks.
Our labeling function is still in the state initial, which means we cannot use it anywhere. To change that, the next chapter will cover running this function on your data.
Running a labeling function
After you've written your labeling function, you have three options to run it on your data:
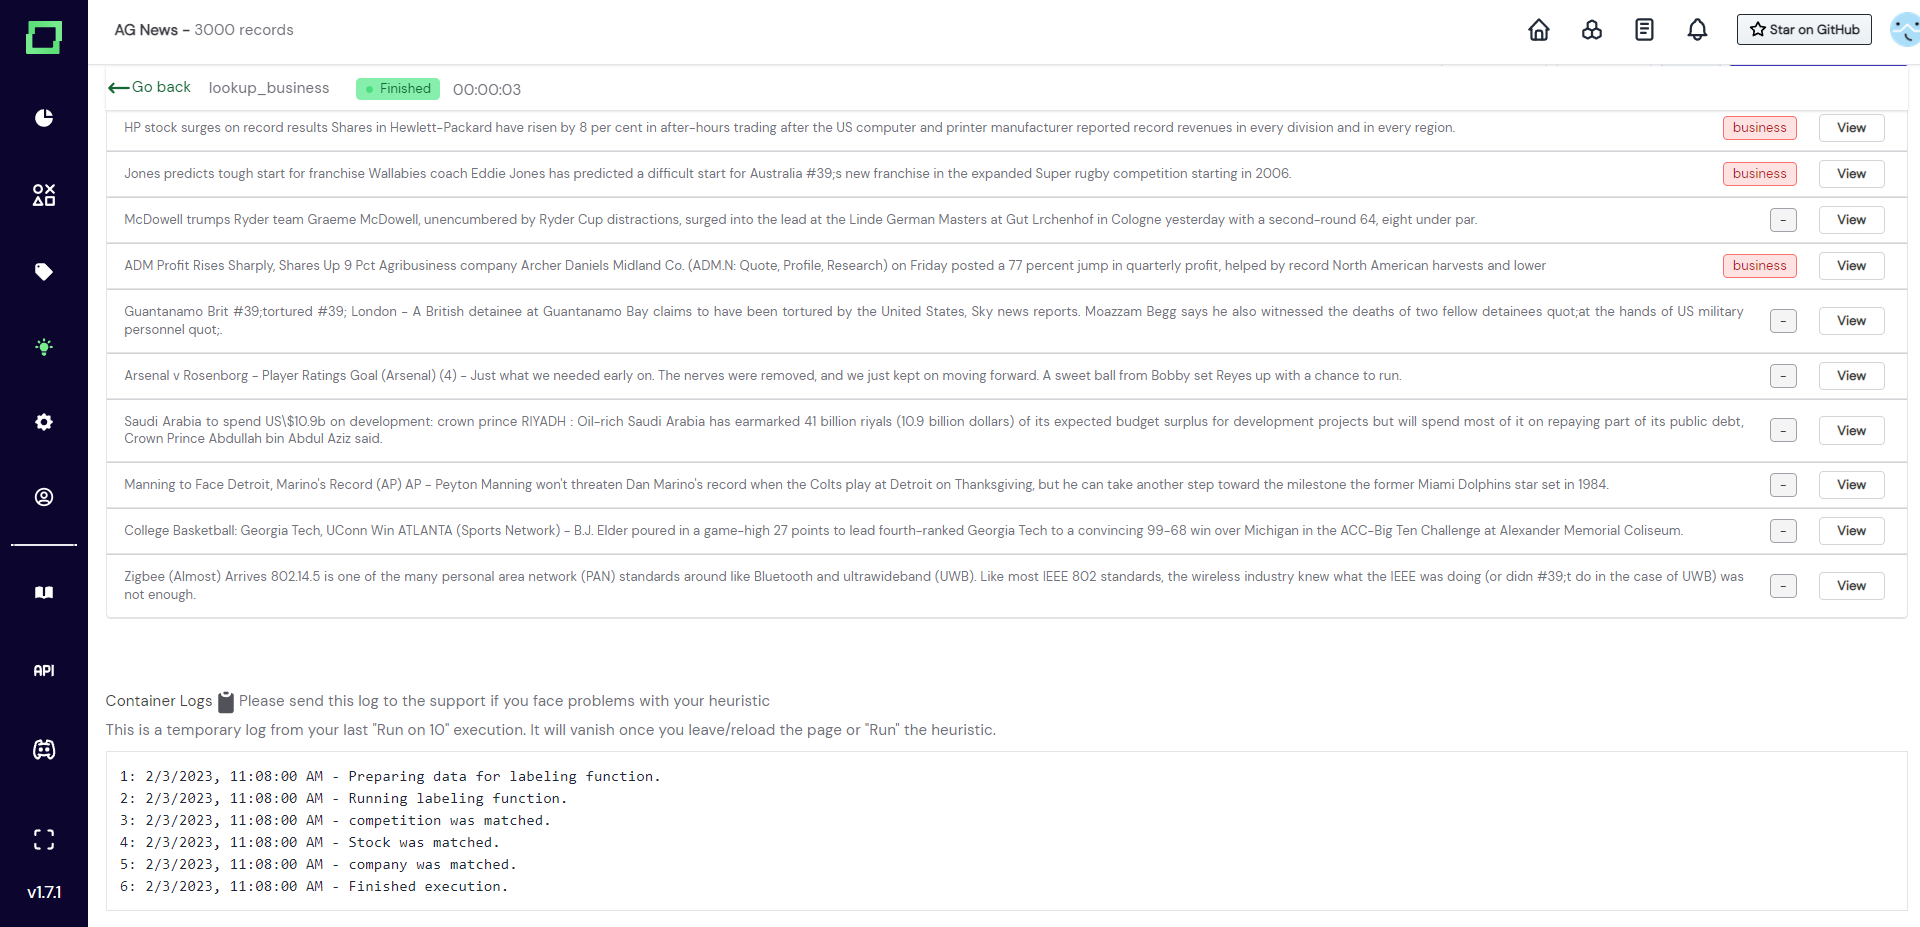
- Run on 10: Randomly sample 10 records from your data and run the selected function on it, then display the selected attribute of the record with the prediction of the labeling function.
- Run: Run the function on all the records of your project. This will alter the state of your labeling function to
runningand after that (depending on the outcome) either tofinishedorerror. - Run + weakly supervise: Just like Run but triggers a weak supervision calculation with all heuristics selected directly afterward.
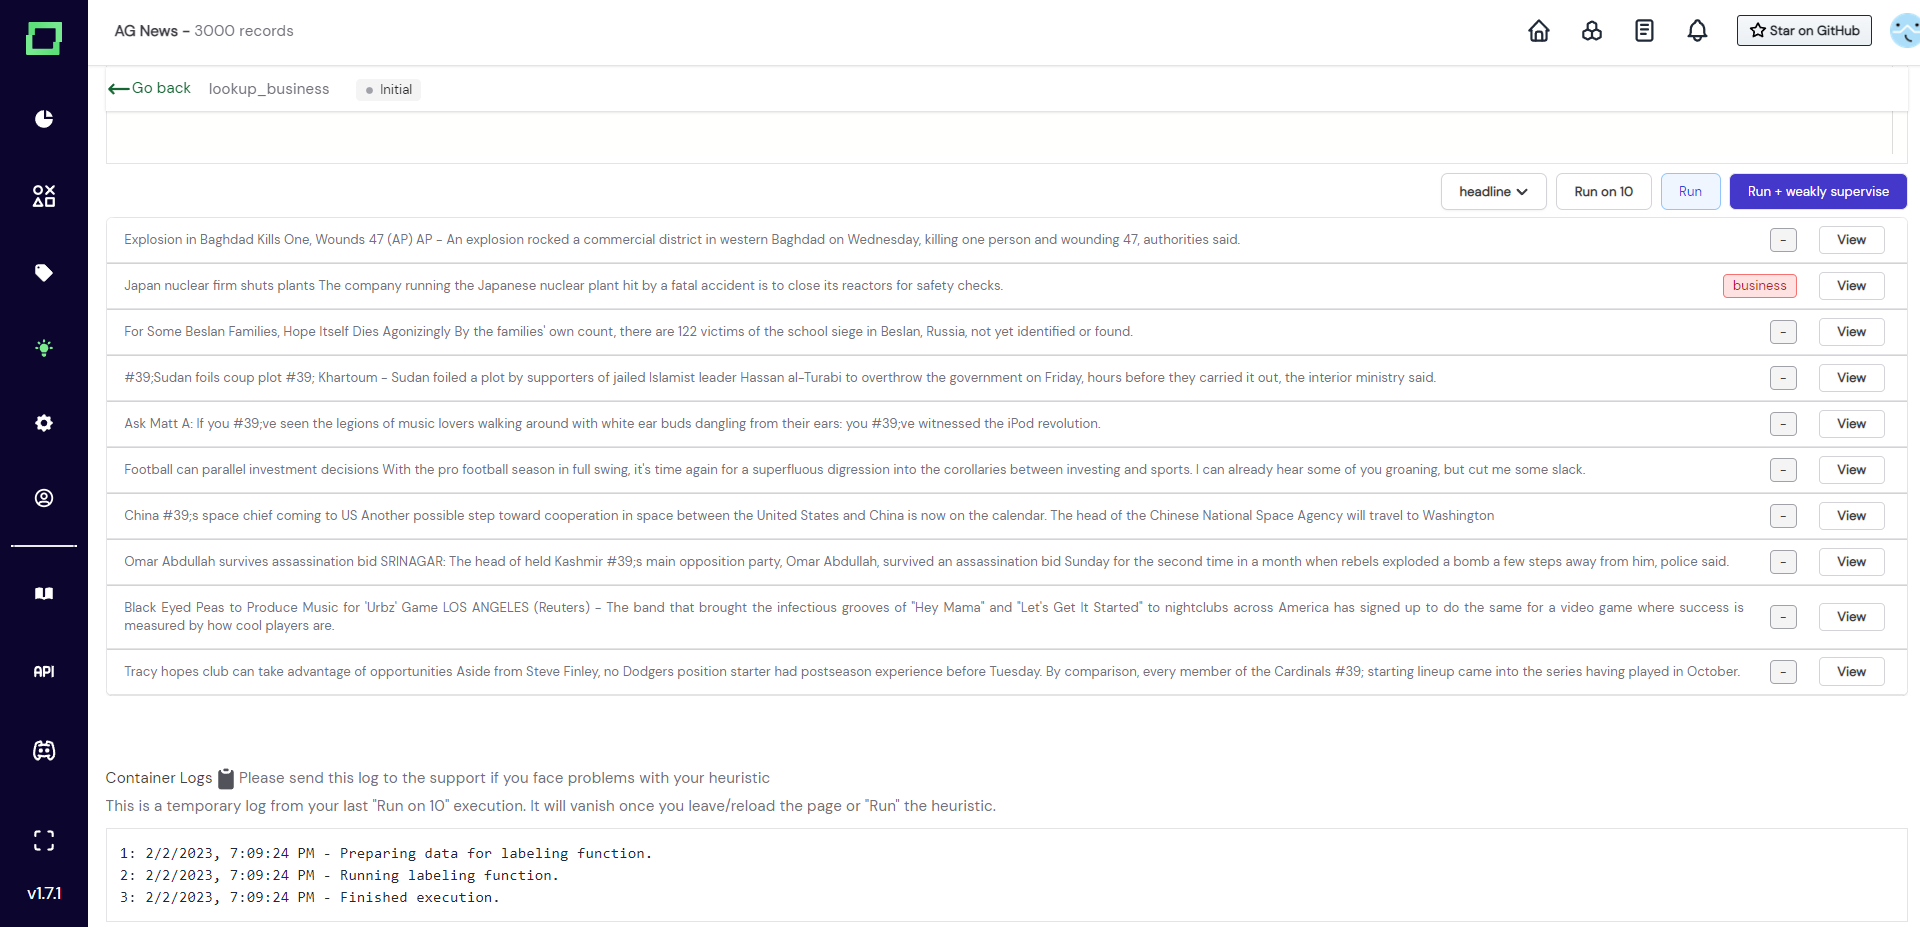
We generally recommend first running your function a bunch of times with the "run on 10" feature, as you can observe edge cases, bugs, and other things while doing so.
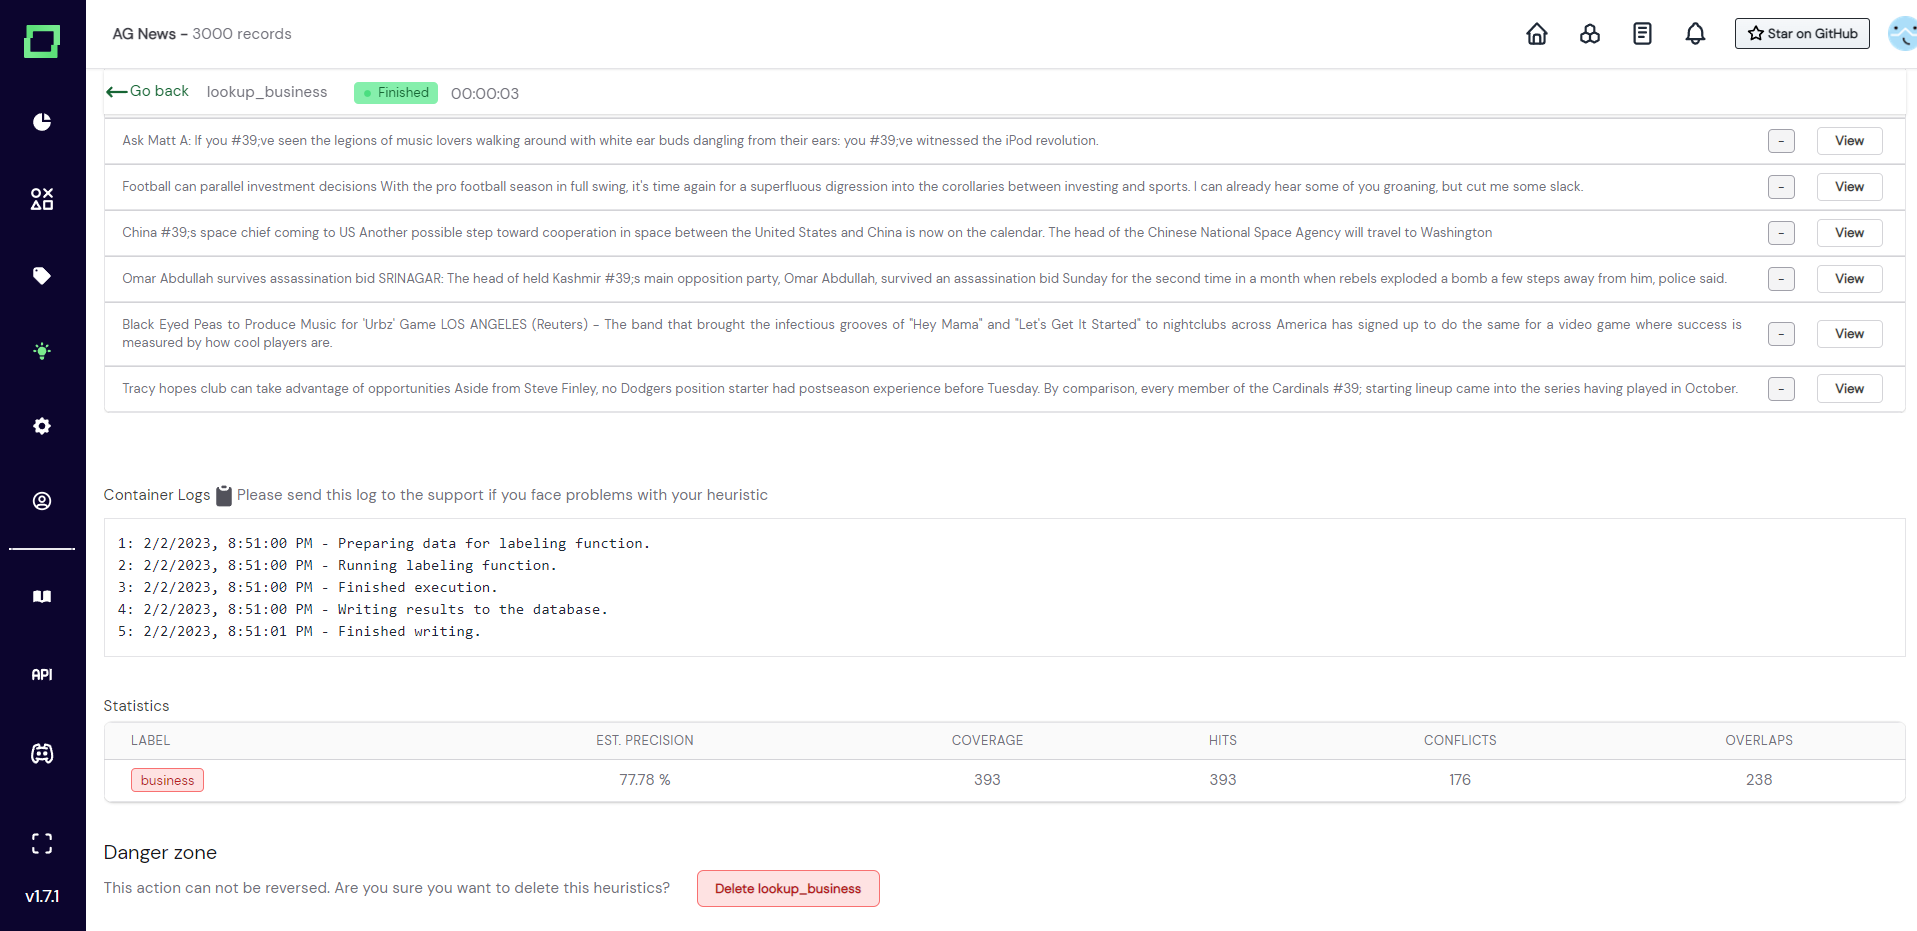
Your code is run as isolated containerized functions, so don't worry about breaking stuff. This is also the reason why we display "container logs" below the code editor. For all the information on these logs, go to the container logs section further down on this page.
Deleting a labeling function
Deleting a labeling function will remove all data associated with it, which includes the heuristic and all the predictions it has made. However, it does not reset the weak supervision predictions. So after deleting a labeling function that was included in the latest weak supervision run, the predictions are still included in the weak supervision labels. Consider re-calculating the weak supervision if that is an issue.
In order to delete the labeling function simply scroll to the very bottom of the labeling function details, click on the delete button, and confirm the deletion in the appearing modal.
Alternatively, you can delete any heuristic on the heuristics overview page by selecting it and going to Actions -> delete selected right next to the weak supervision button. Don't worry, there will still be a confirmation modal.
Container logs
When you run (or run on 10) your labeling function, refinery executes it in a freshly spawned docker container, which you cannot inspect easily from outside as it shuts itself down after the calculation finishes. That is why we display the resulting logs of the execution on the labeling function details page.
The logs of the latest full run are persisted in the database while the logs of the "run on 10" feature are only cached in the frontend, which means you will lose them as soon as you refresh or leave the page.
Besides inspecting error messages, you can also use the container logs for debugging your labeling function using print statements.
Best practices and examples
Validation
After running your labeling function on the whole dataset, you get statistics describing its performance. The statistics should be used as an indicator of the quality of the labeling function. Make sure to understand those statistics and follow best practices in evaluating heuristics.
Lookup lists for distant supervision
You'll quickly see that many of the functions you want to write are based on list expressions. But hey, you most certainly don't want to start maintaining a long list in your heuristic, right? That's why we've integrated automated lookup lists into our application.
As you manually label spans for your extraction tasks, we collect and store these values in a lookup list for the given label.
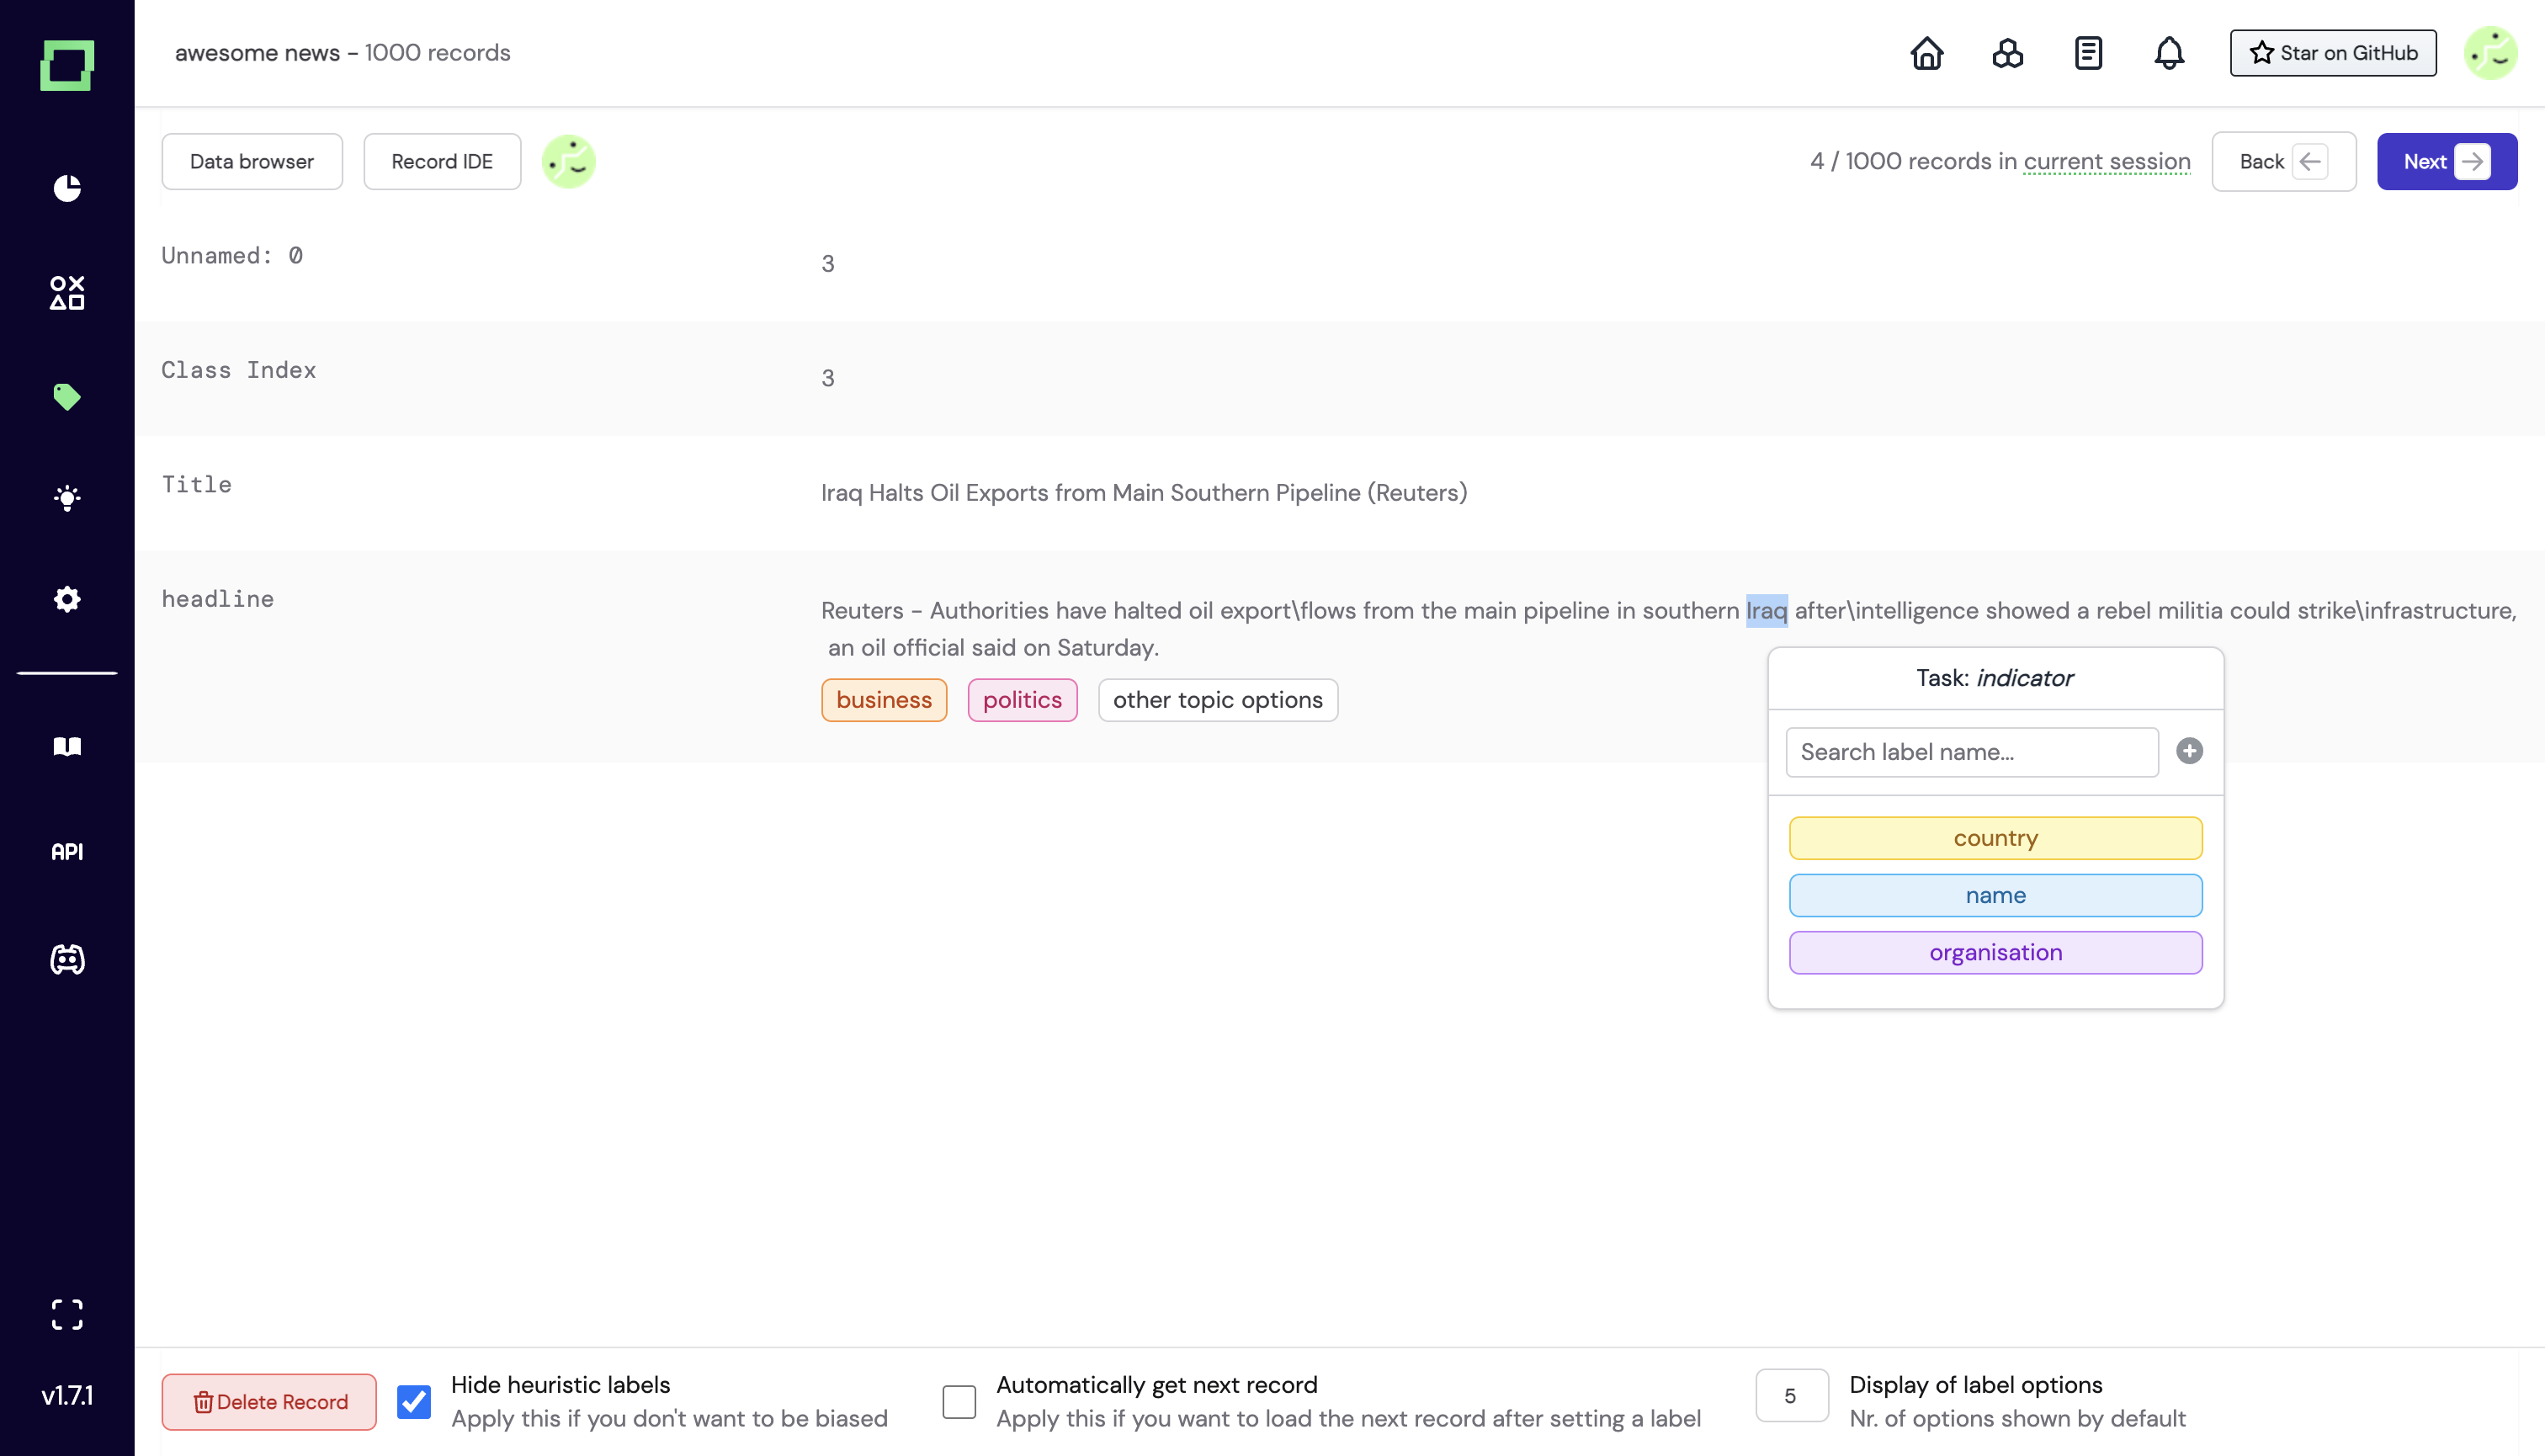
You can access them via the heuristic overview page when you click on "Lookup lists". You'll then find another overview page with the lookup lists.
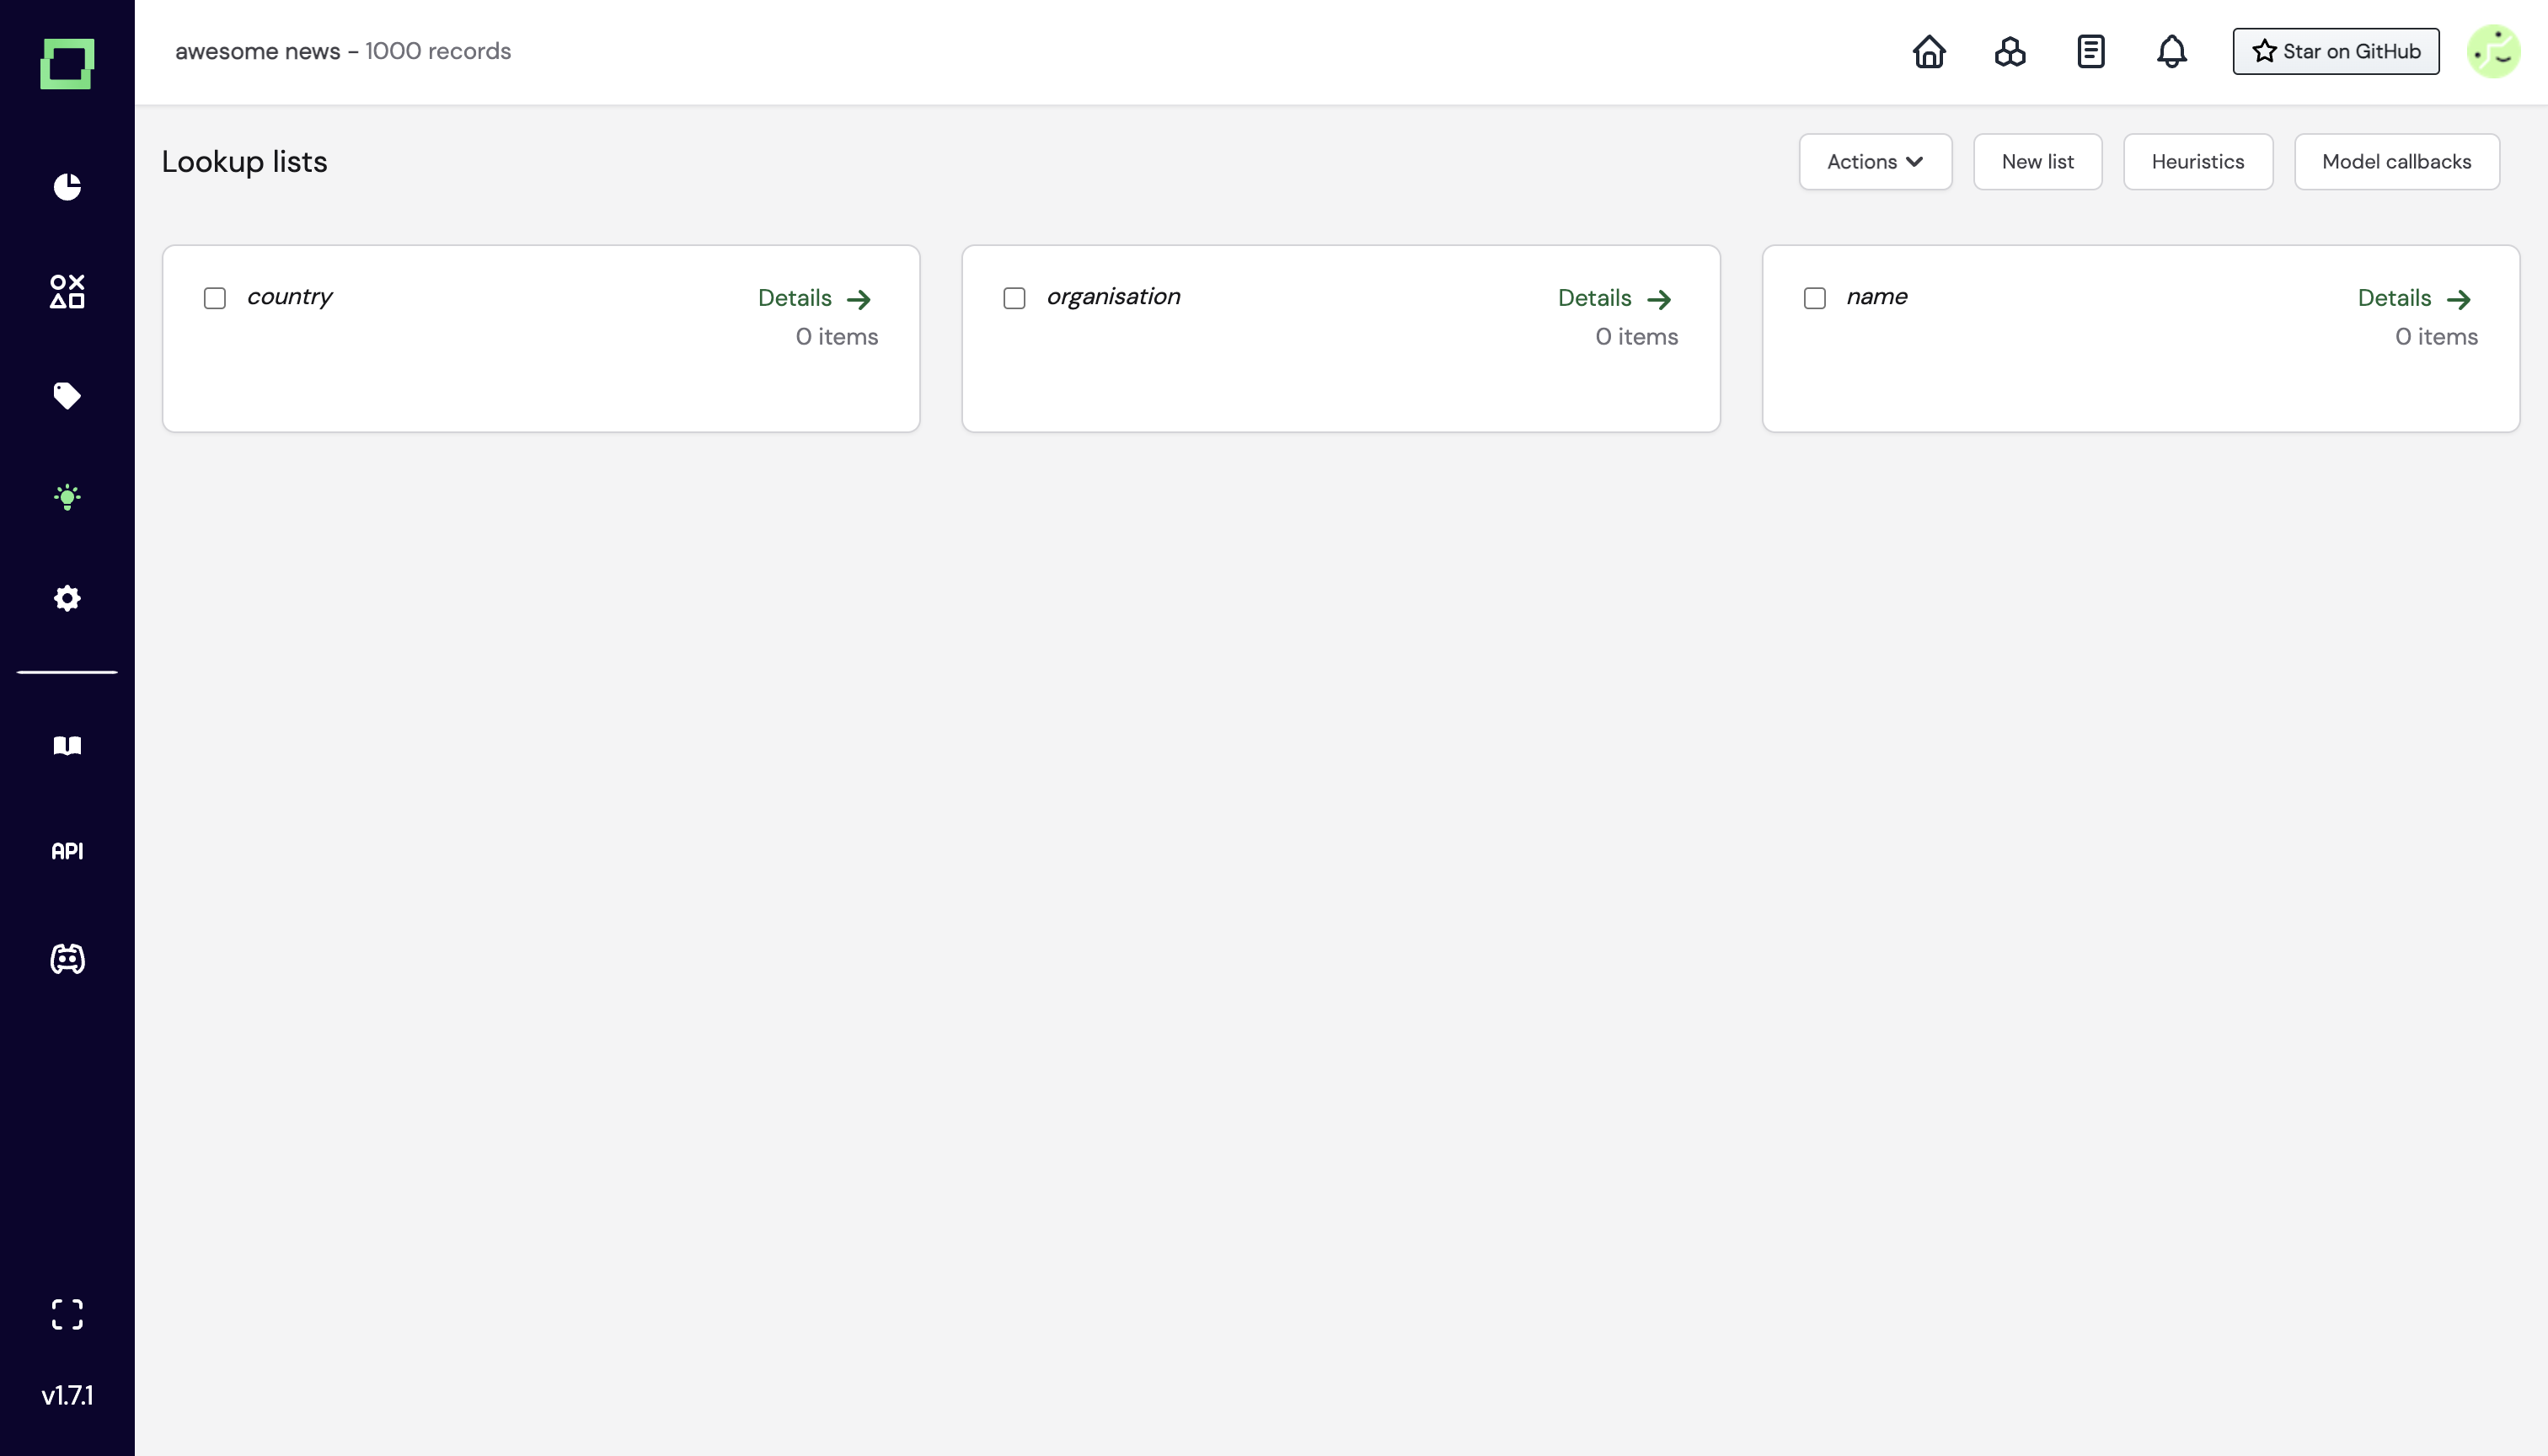
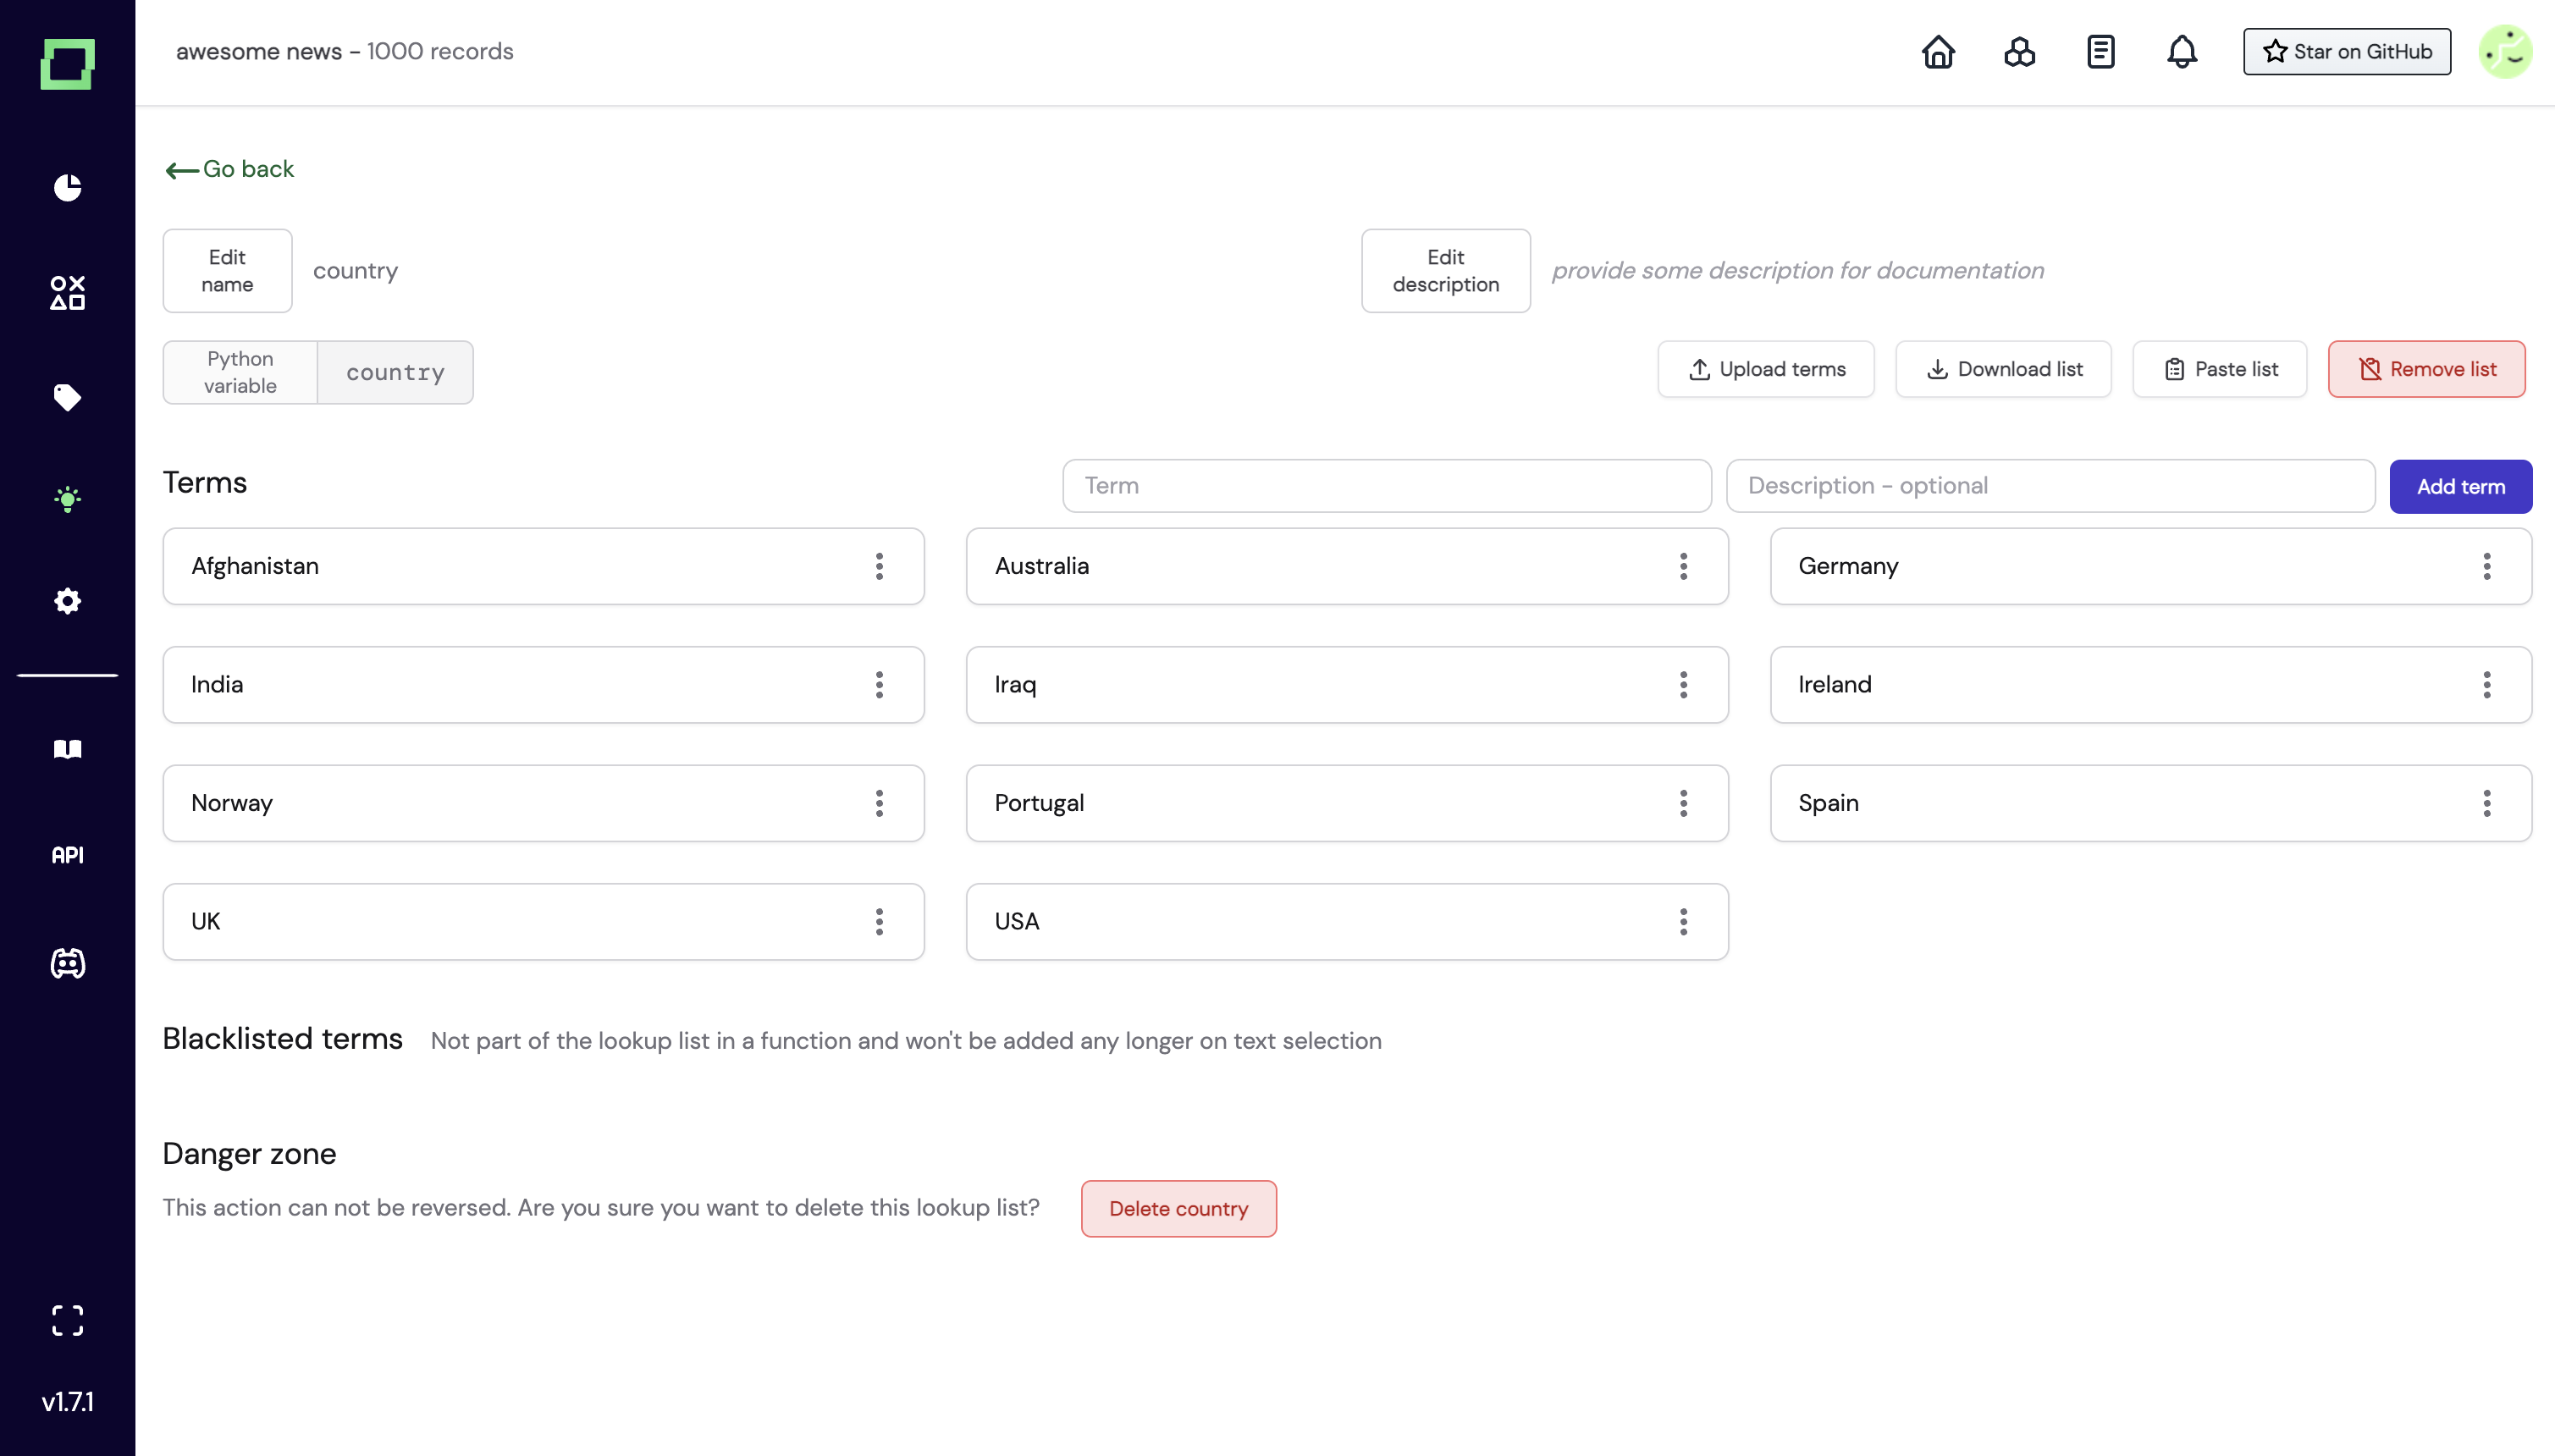
If you click on "Details", you'll see the respective list and its terms. You can of course also create them fully manually, and add terms as you like. This is also helpful if you have a long list of regular expressions you want to check for your heuristics. You can also see the python variable for the lookup list, as in this example country.
In your labeling function, you can then import it from the module knowledge, where we store your lookup lists. In this example, it would look as follows:
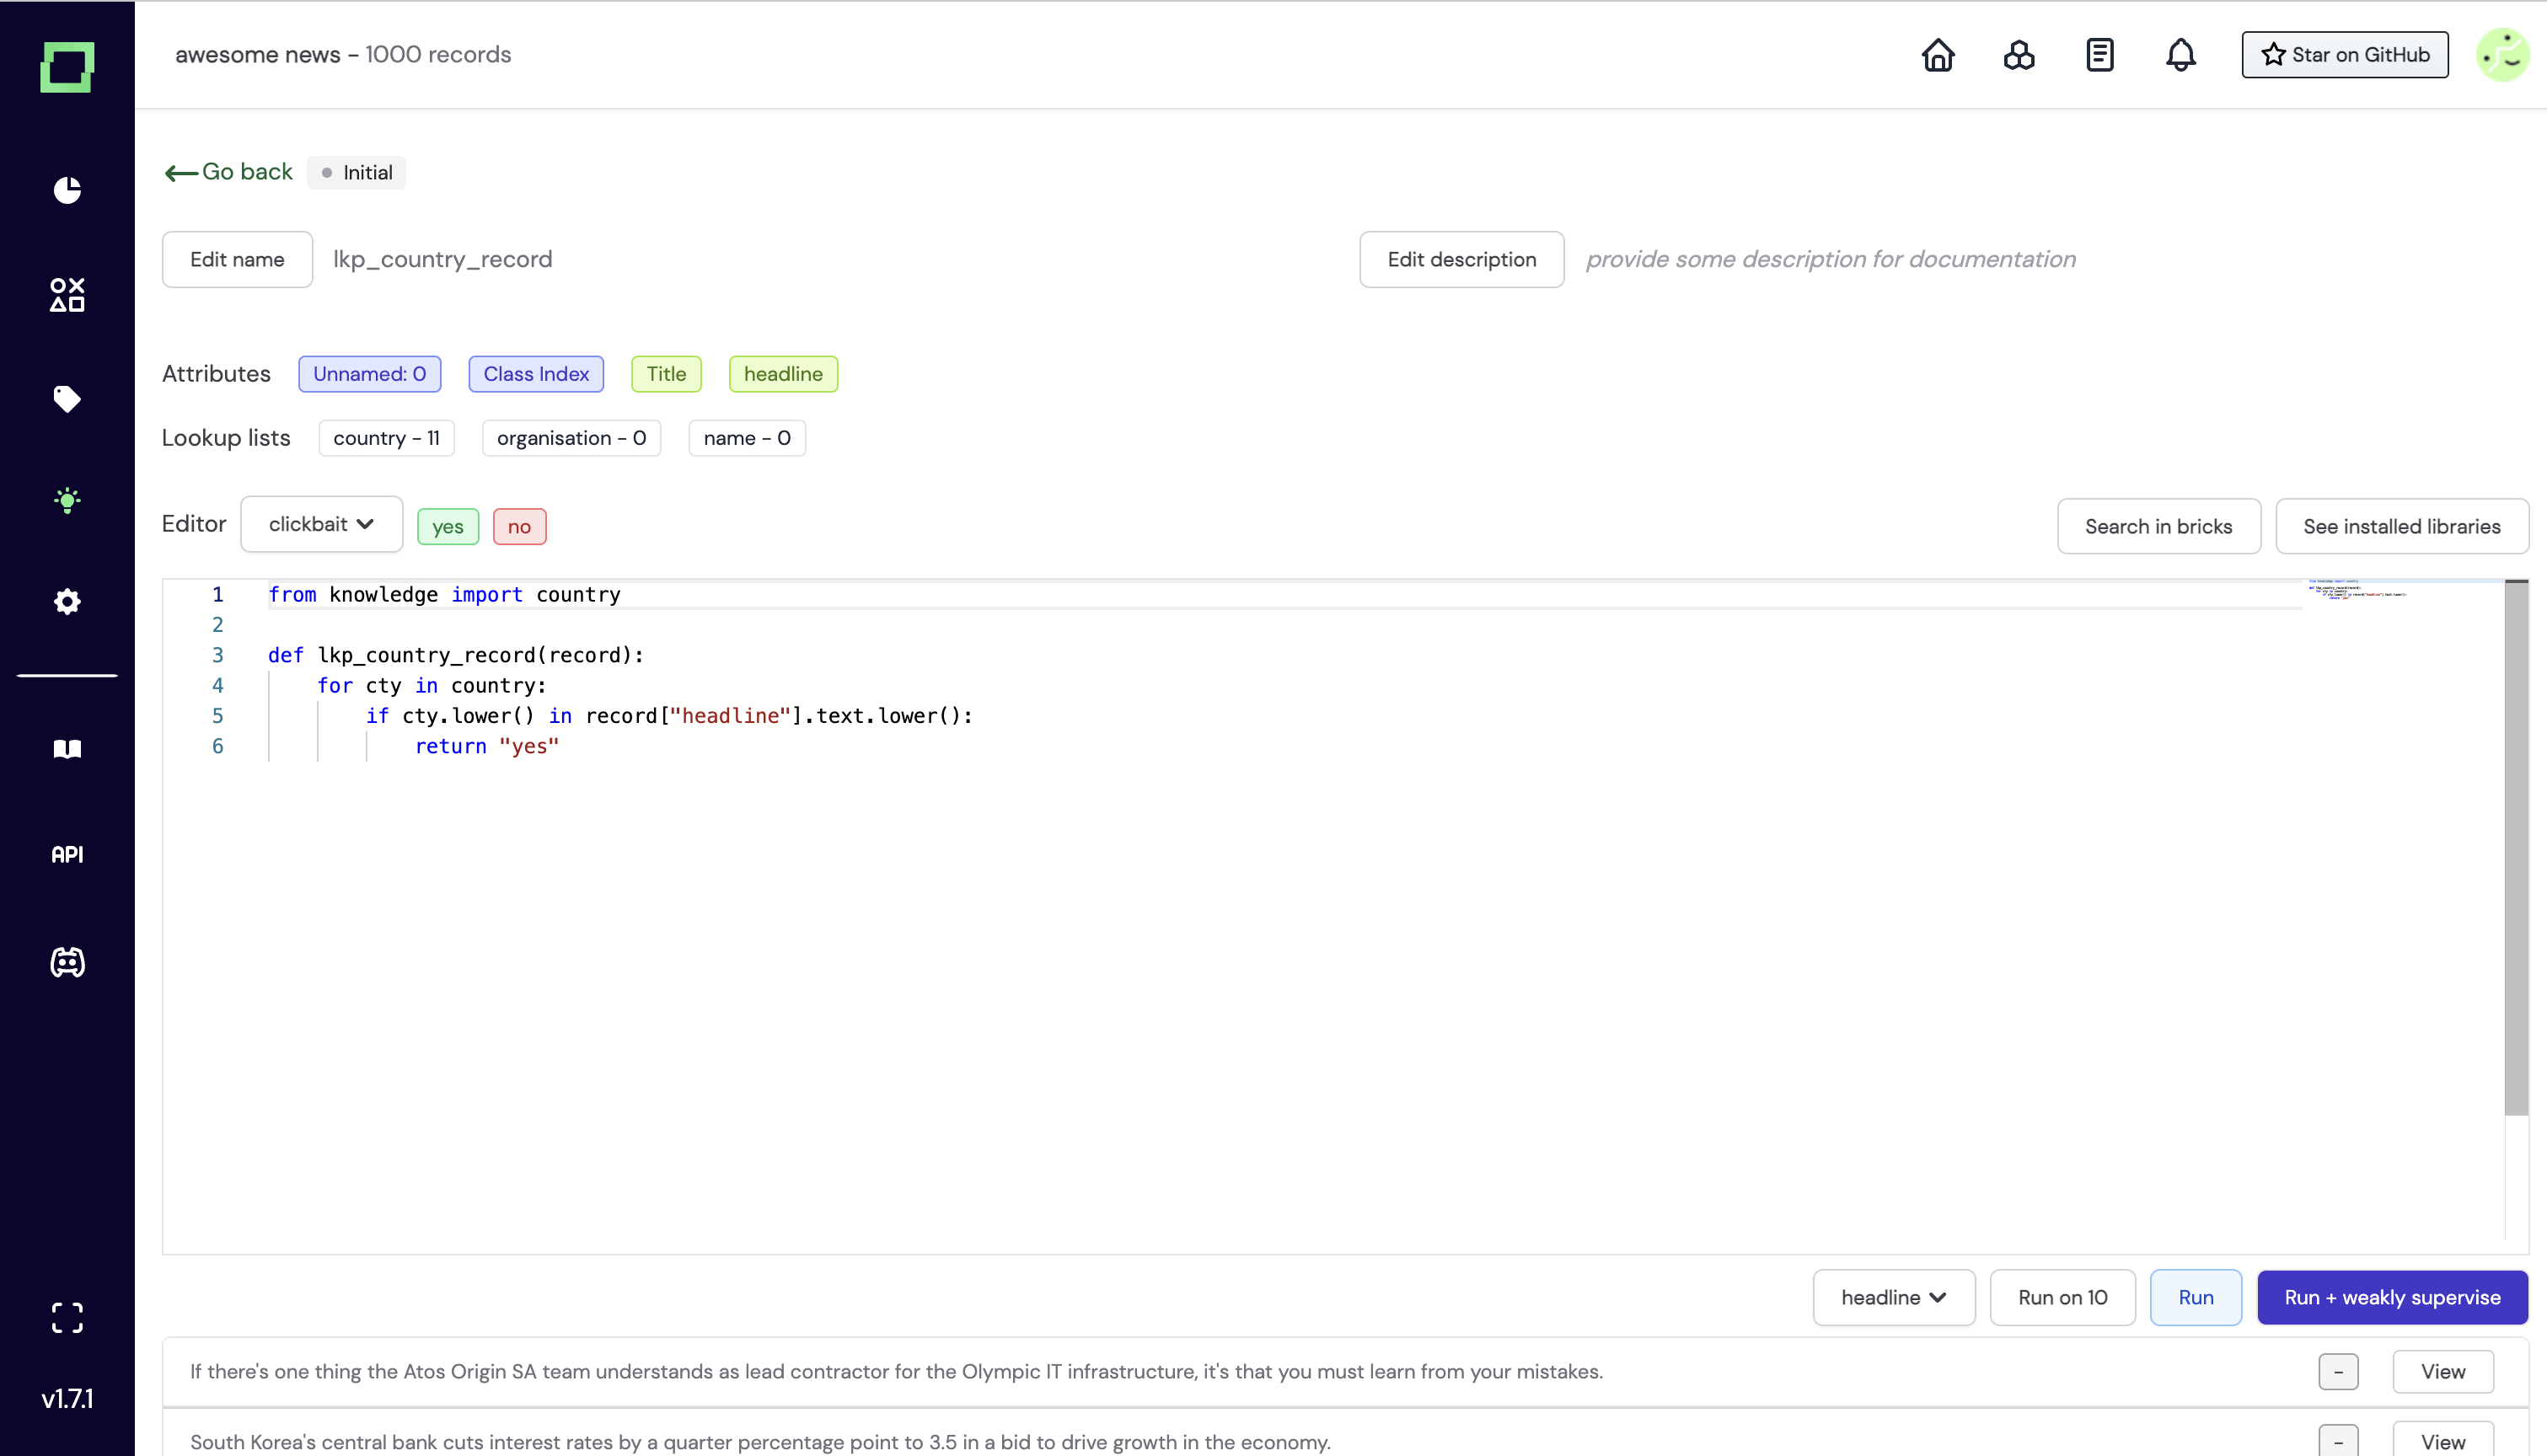
Heuristics for extraction tasks
You might already wonder what labeling functions look like for extraction tasks, as labels are on token-level. Essentially, they differ in two characteristics:
- you use
yieldinstead ofreturn, as there can be multiple instances of a label in one text (e.g. multiple people) - you specify not only the label name but also the start index and end index of the span.
An example that incorporates an existing knowledge base to find further examples of this label type looks as follows:
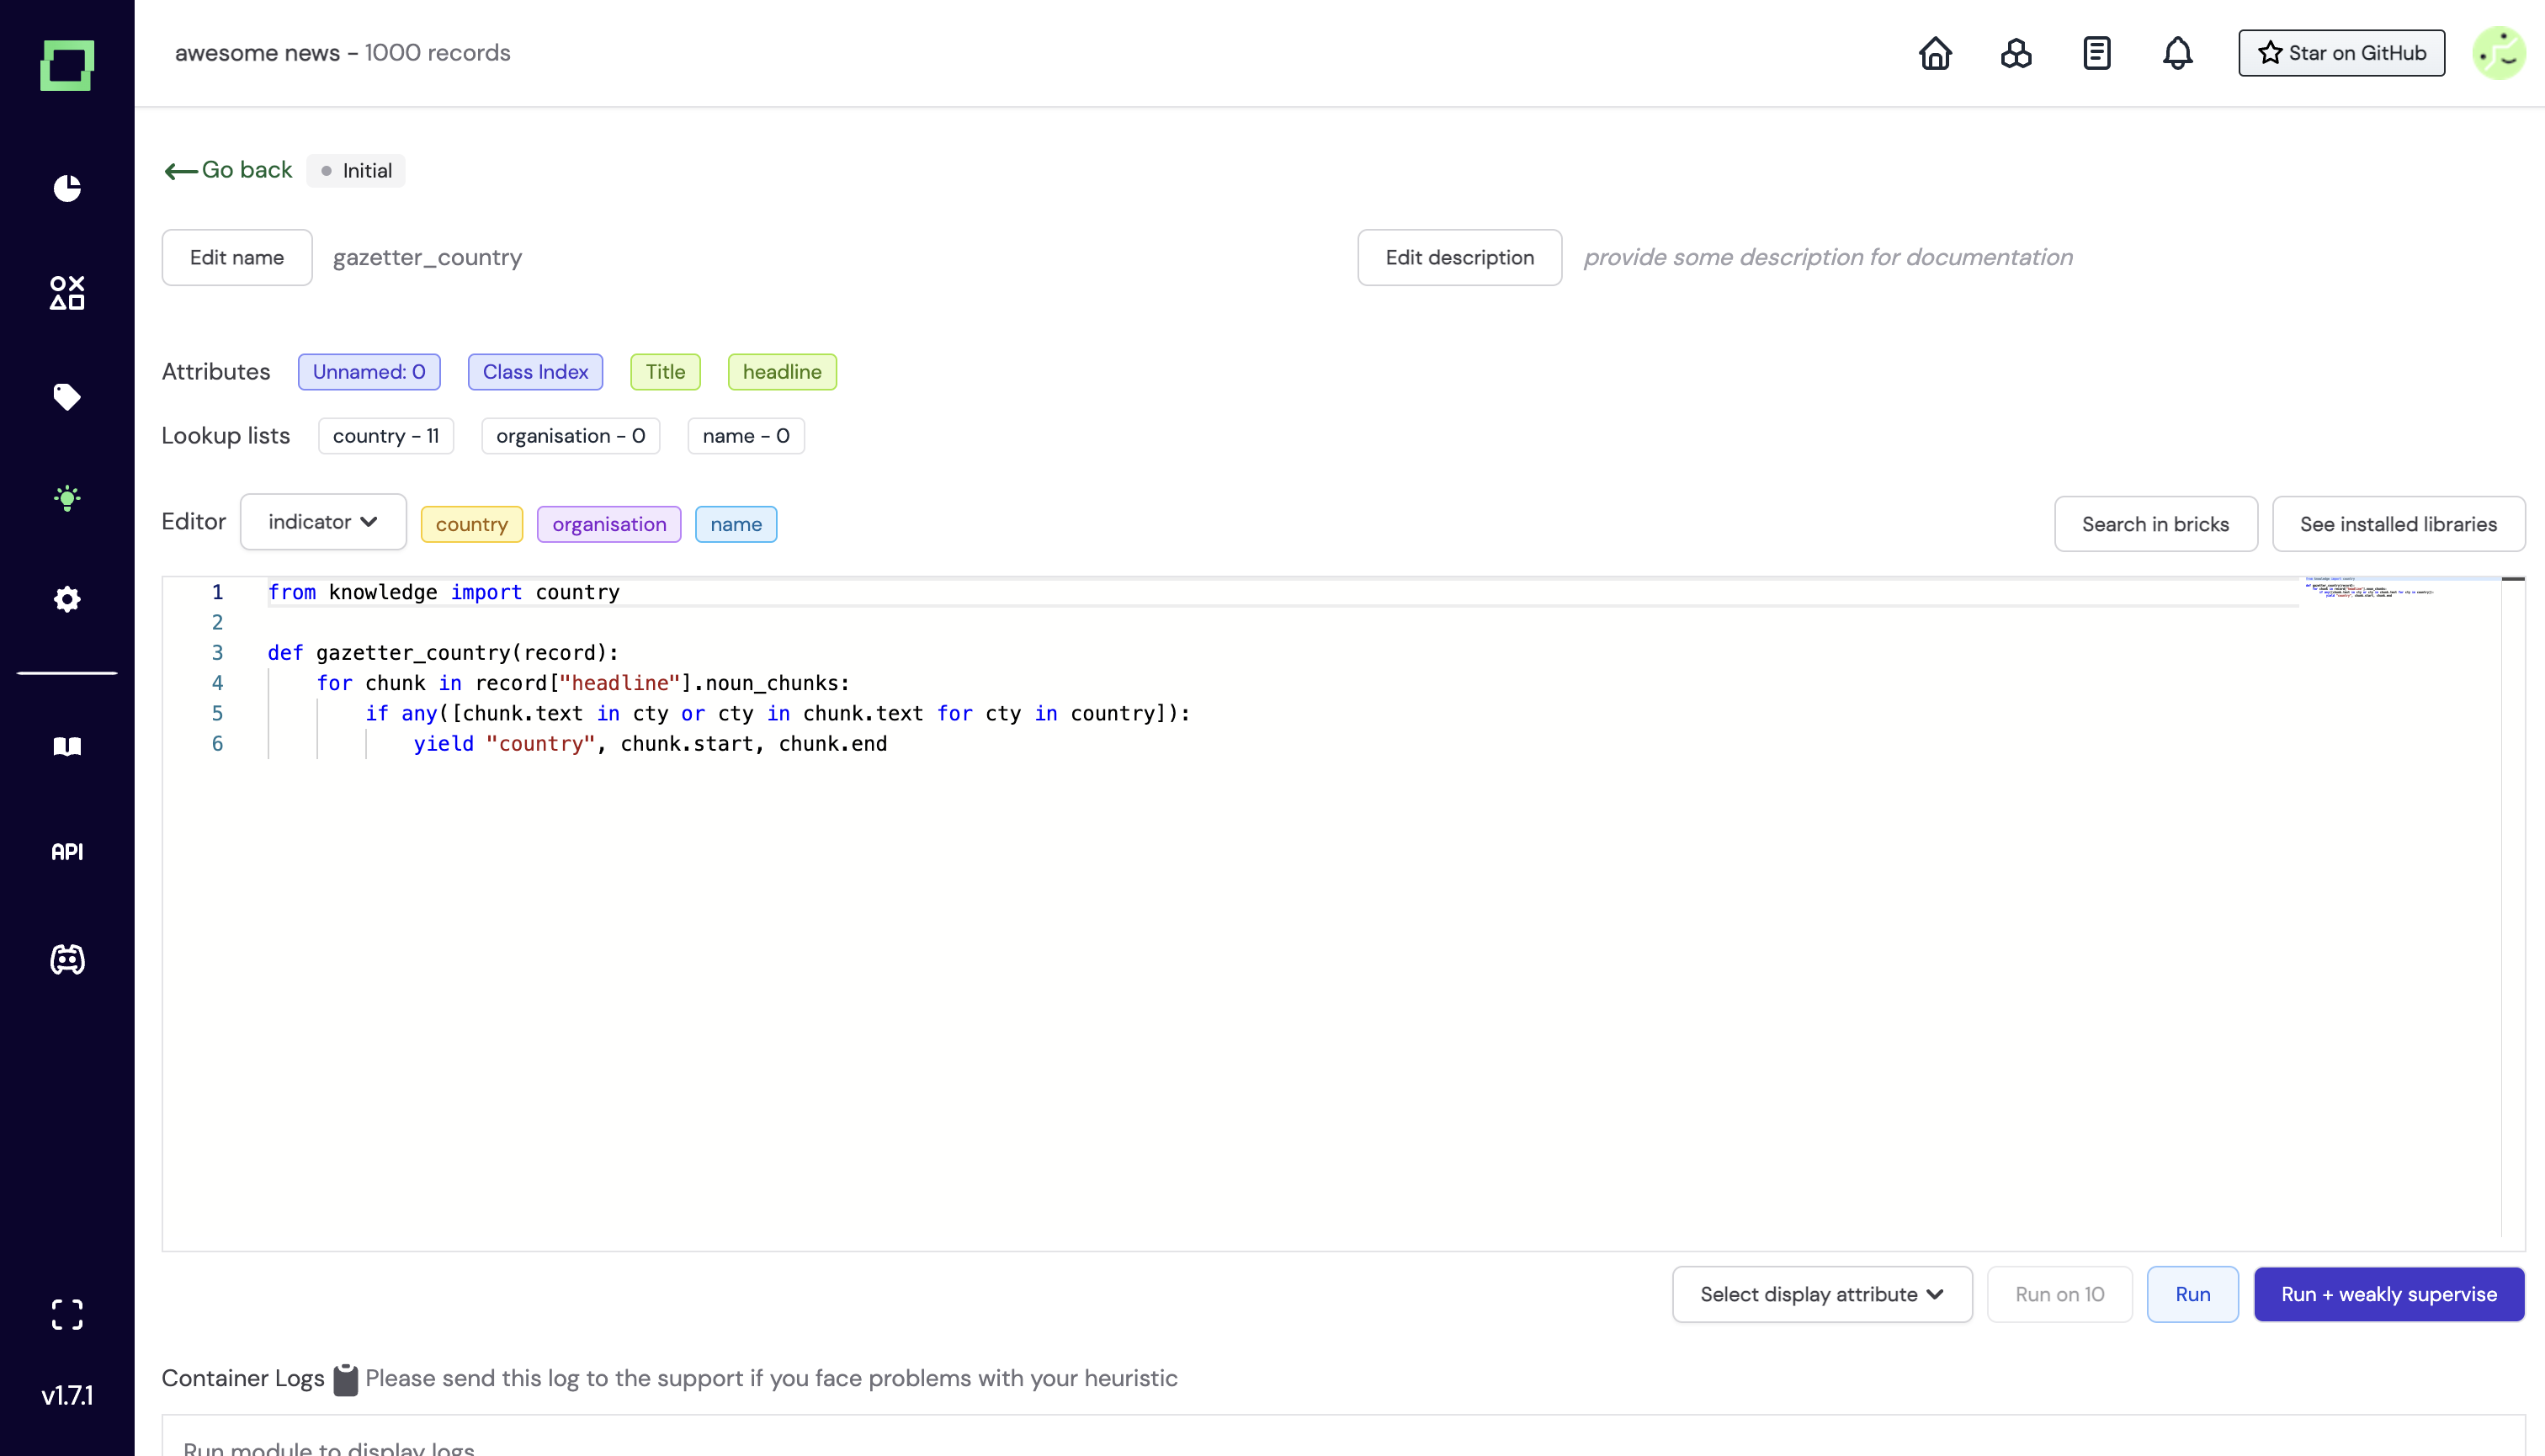
This is also where the tokenization via spaCy comes in handy. You can access attributes such as noun_chunks from your attributes, which show you the very spans you want to label in many cases. Our template functions repository contains some great examples of how to use that.
Active learners
Active learners are few-shot learning models that leverage the powerful pre-trained language models that created the embeddings of your records. You can treat them as custom classification heads that are trained on your labeled reference data. They are different from the classical notion of an active learner in the sense that they do not query the user for data points to be labeled, but more on that in the best practices section.
Many concepts in the UI are similar to the ones of the labeling functions.
Creating an active learner
To create a labeling function simply navigate to the heuristics page and select "Active learning" from the "New heuristic" button.
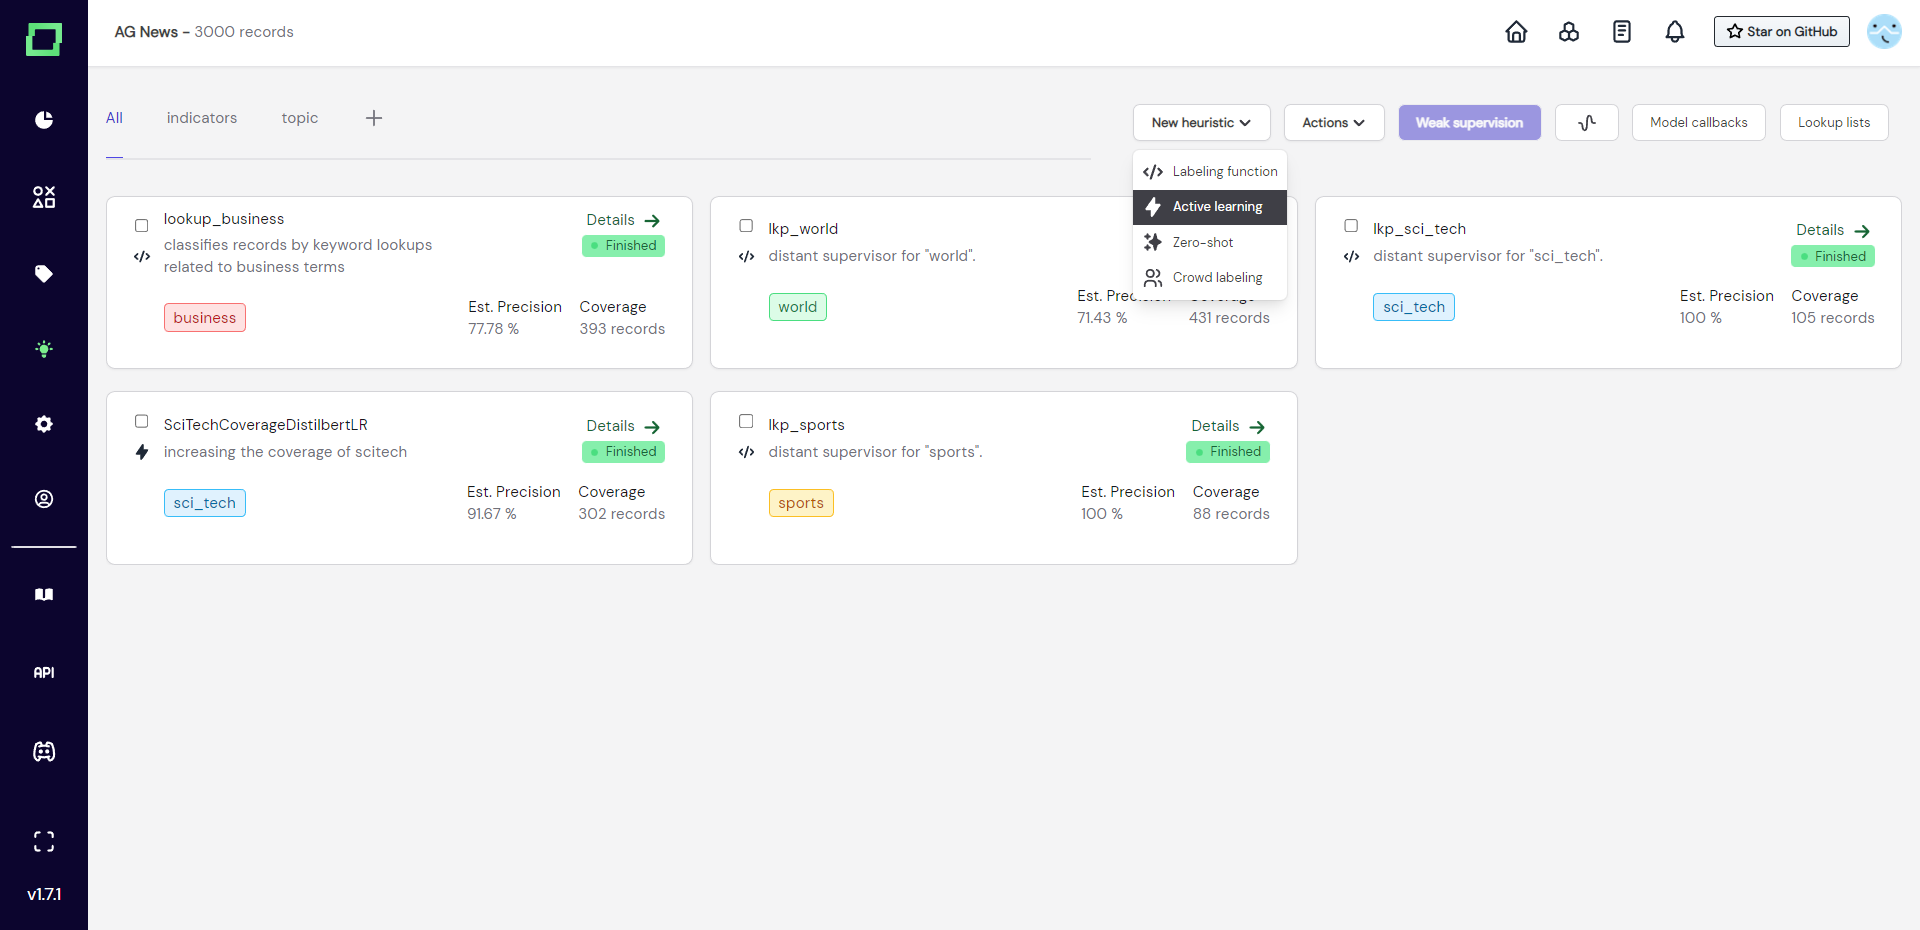
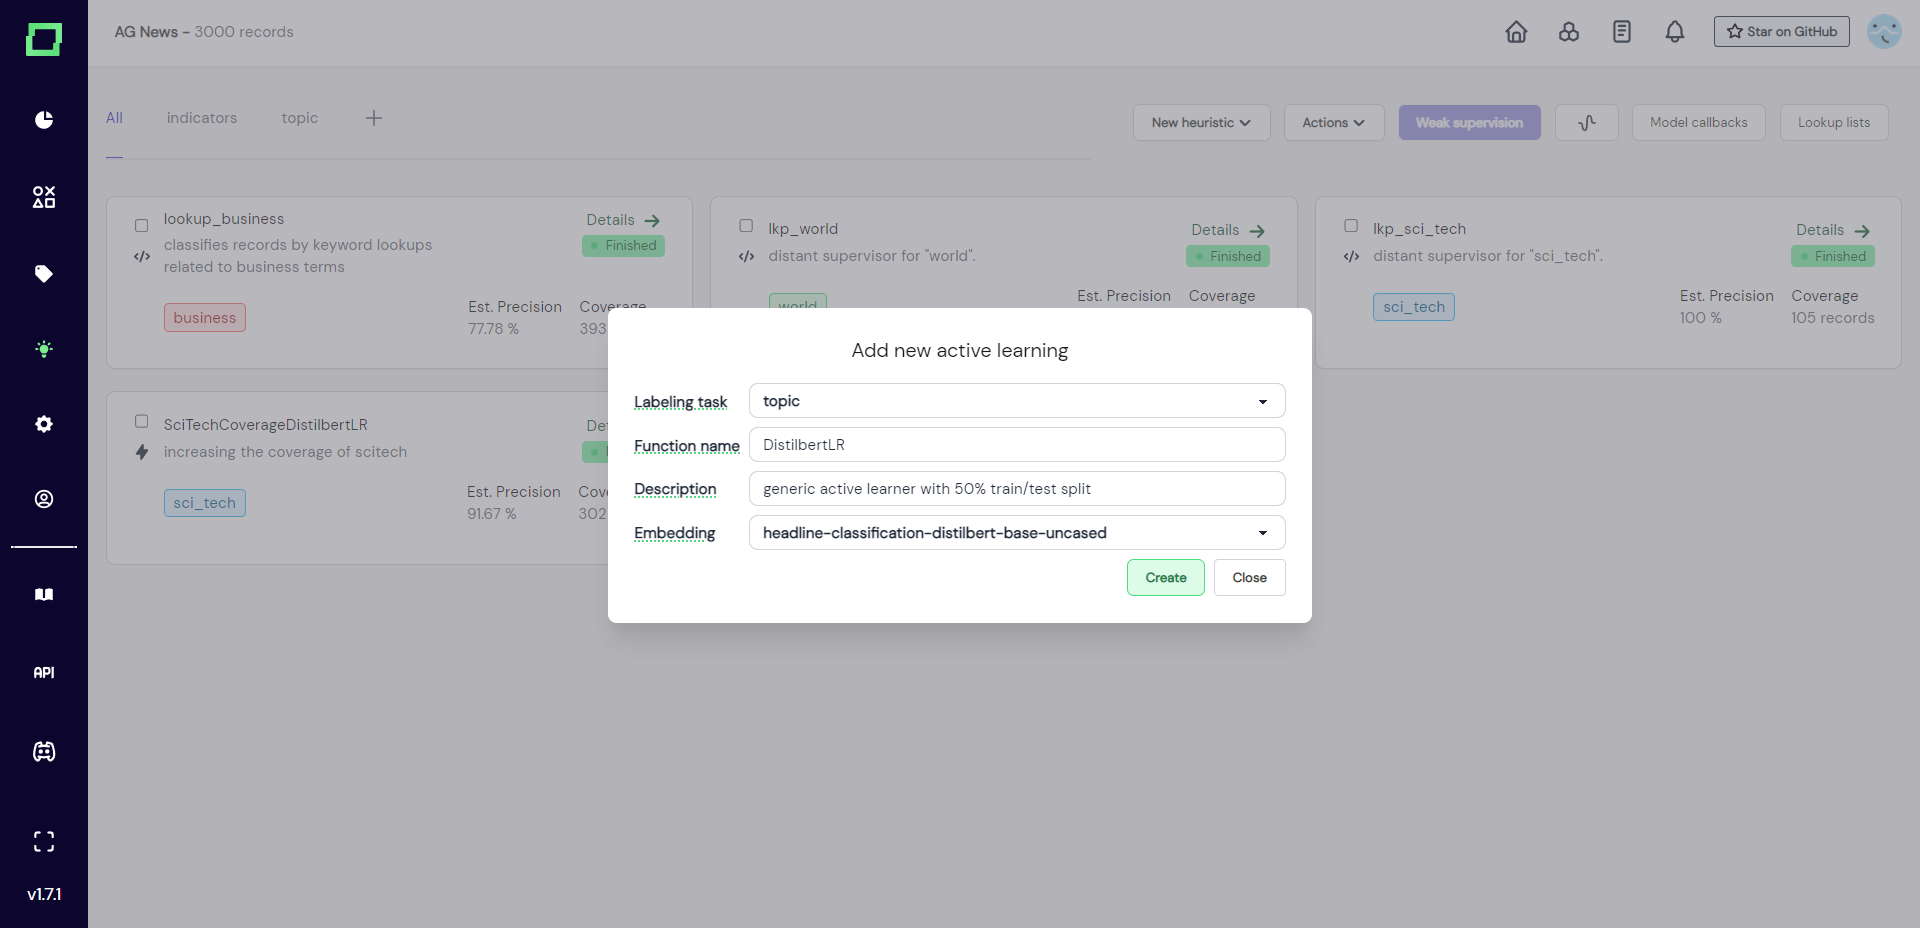
After that, a modal will appear where you need to select the labeling task that this heuristic is for and give the active learner a unique name and an optional description. These selections are not finite and can be changed later, but they are used for the initial code generation, which will be a lot easier to use if you select the right things.
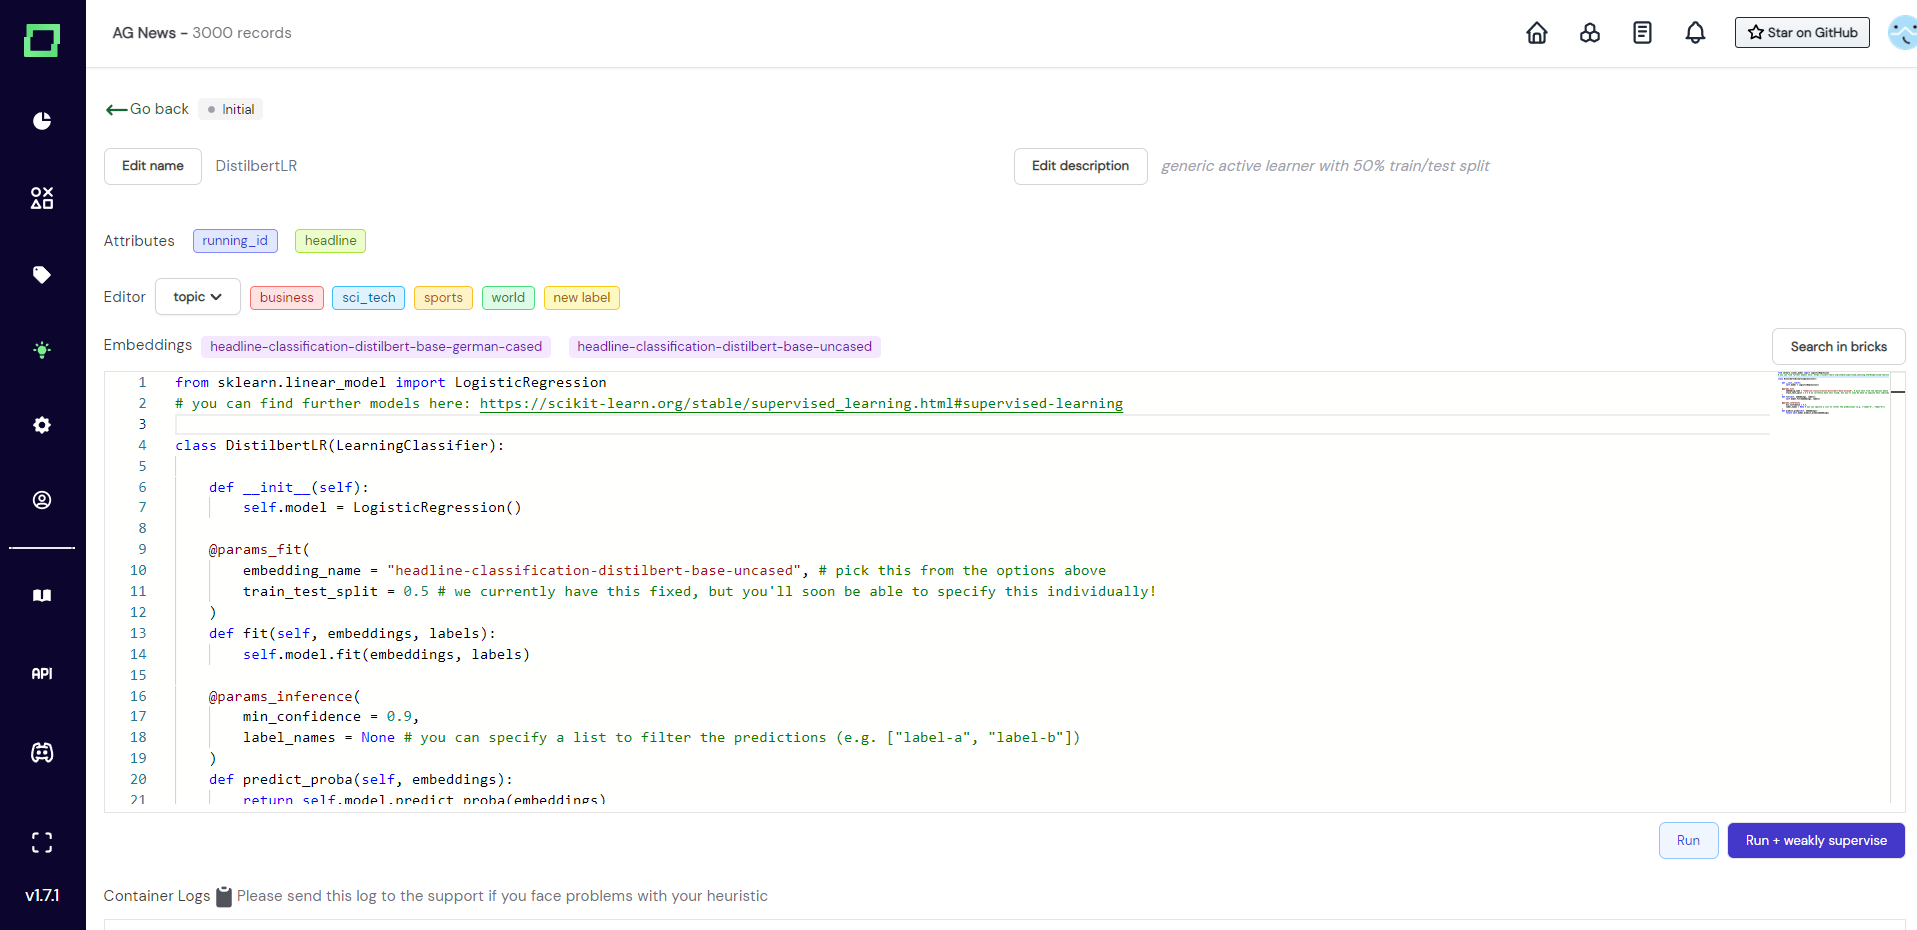
After creation, you will be redirected to the details page (Fig. 3) of that active learner, which is also accessible from the heuristics overview. There is a lot of pre-filled code, which will be explained in the next section, where we write an active learner.
Writing an active learner
When you create an active learner, there will be a lot of pre-filled code, which is a good baseline to work with, that you should keep as a structure and only exchange parts of. If you are not interested in the technical details and want to use active learners without touching code too much, please skip forward to the best practices and examples.
Generally, you have to define a new class that carries the name of the active learner, which implements an abstract LearningClassifier (see Fig. 3). In order to use this active learner, you have to implement three abstract functions:
__init__(self): initializes theself.modelwith an object that fulfills sklearn estimator interface. Can be modified to use the model of your choice.fit(self, embeddings, labels): fitsself.modelto the embeddings and labels. Should not be modified.predict_proba(self, embeddings): makes predictions withself.modeland returns the probabilities of those predictions. Should not be modified.
If you are wondering why you should not modify two of those functions, it is because we put all the interchangeable parameters into the decorators (which begin with an "@").
In @params_fit you can specify the embedding name and train-test-split for the fitting process of your model. All valid embedding names can be seen above the code editor and the specified embedding will also be the one used for prediction. The train-test-split is currently fixed to a 50/50 split to ensure that there are enough records for thorough validation.
In @params_inference you can specify the minimal confidence that your model should have in order to output the prediction it made and the label names which this active learner should make predictions for. One active learner can be trained on any amount of classes. If you specify None, then all the available labels are used. The default value for min_confidenceis 0.9, which makes sure that your predictions are less noisy. If you find to suffer from very low coverage, consider changing this value, but the lower you set it, the more validation data should be available.
Per default, we use the LogisticRegression from sklearn, which is common practice and we recommend trying it before switching to another model.
Running an active learner
After you have finished writing your active learner (or just went with the default one), you can run it using either:
- Run: Fits the active learner on all manually labeled records from the training split that carry a label specified in
label_names. After the fitting, it will make predictions for all records while obeying the specifiedmin_confidence. Finally, it will calculate the statistics using the test records. This action will alter the state of your active learner first to running and after that (depending on the outcome) either to finished or error. - Run + weakly supervise: Just like Run but triggers a weak supervision calculation with all heuristics selected directly afterward.
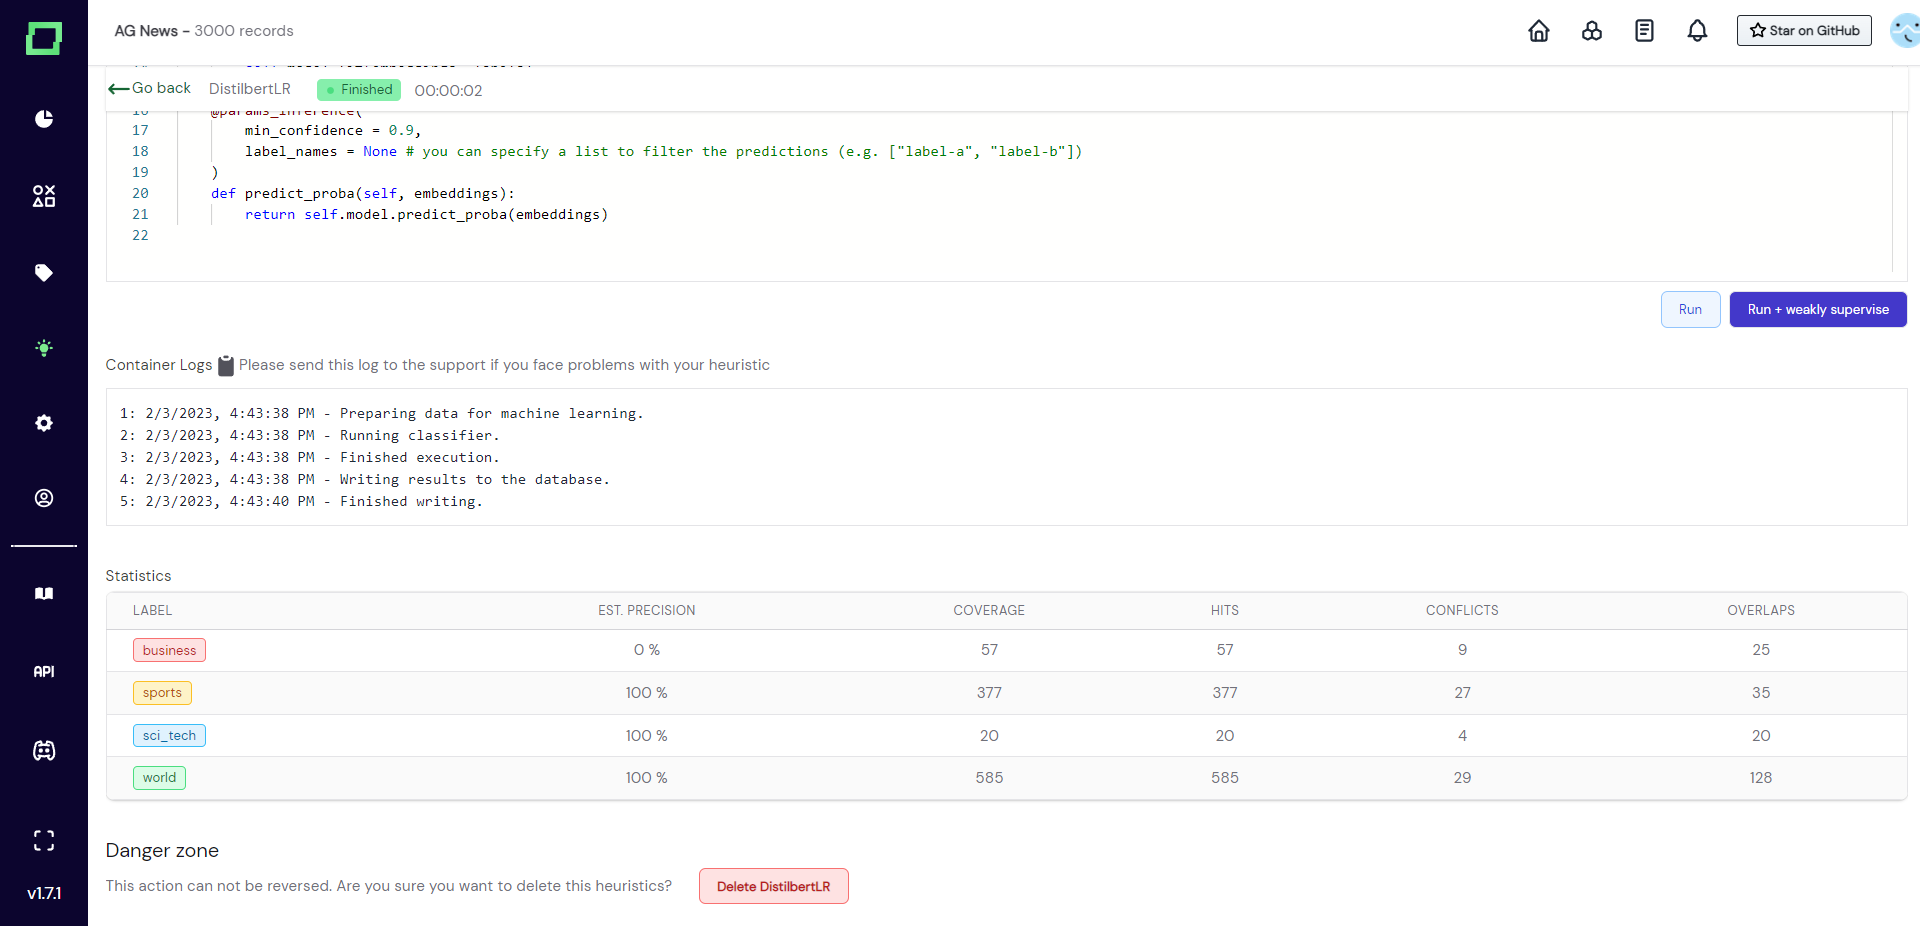
For more details on the statistics, please visit the page about evaluating heuristics.
Deleting an active learner
Deleting an active learner will remove all data associated with it, which includes the heuristic and all the predictions it has made. However, it does not reset the weak supervision predictions. So after deleting an active learner that was included in the latest weak supervision run, the predictions are still included in the weak supervision labels. Consider re-calculating the weak supervision if that is an issue.
In order to delete the active learner simply scroll to the very bottom of the active learner details, click on the delete button, and confirm the deletion in the appearing modal.
Alternatively, you can delete any heuristic on the heuristics overview page by selecting it and going to "Actions" -> "delete selected" right next to the weak supervision button. Don't worry, there will still be a confirmation modal.
Best practices and examples
Validation
After running your active learner on the whole dataset, you get statistics describing its performance. The statistics should be used as an indicator of the quality of the active learner. Make sure to understand those statistics and follow best practices in evaluating heuristics.
Custom active learning model
You can use Scikit-Learn inside the editor as you like, e.g. to extend your model with grid search. The self.model is any model that fits the Scikit-Learn estimator interface, i.e. you can also write code like this:
from sklearn.model_selection import GridSearchCV
from sklearn.tree import DecisionTreeClassifier

class ActiveDecisionTree(LearningClassifier):

    def __init__(self):
        params = {
            "criterion": ["gini", "entropy"],
            "max_depth": [5, 10, None]
        }
        self.model = GridSearchCV(DecisionTreeClassifier(), params, cv=3)

# ...
As with any other heuristic, your function will automatically and continuously be evaluated against the data you label manually.
Minimum confidence for finetuning
One way to improve the precision of your heuristics is to label more data (also, there typically is a steep learning curve, in the beginning, so make sure to label at least some records). Another way is to increase the min_confidence threshold of the @params_inference decorator. Generally, precision beats recall in active learners for weak supervision, so it is perfectly fine to choose higher values for the minimum confidence.
Active learning for extraction
We're using our own library sequencelearn to enable a Scikit-Learn-like API for programming span predictors, which you can also use outside of our application.
Other than importing a different library, the logic works analog to active learning classifiers.
Zero-shot classifiers
Zero-Shot Classification refers to the task of predicting a class that wasn't seen by the model during training. In refinery, this is accomplished by embedding the label names and text attributes into the same space, where distance metrics (e.g. cosine similarity) can be used to assign the closest label to the respective record. Read more about zero-shot classification here.
Zero-shot classifiers are only available for multiclass classification. We are still in the process of investigating the capabilities of zero-shot classifiers for extraction tasks.
Creating a zero-shot classifier
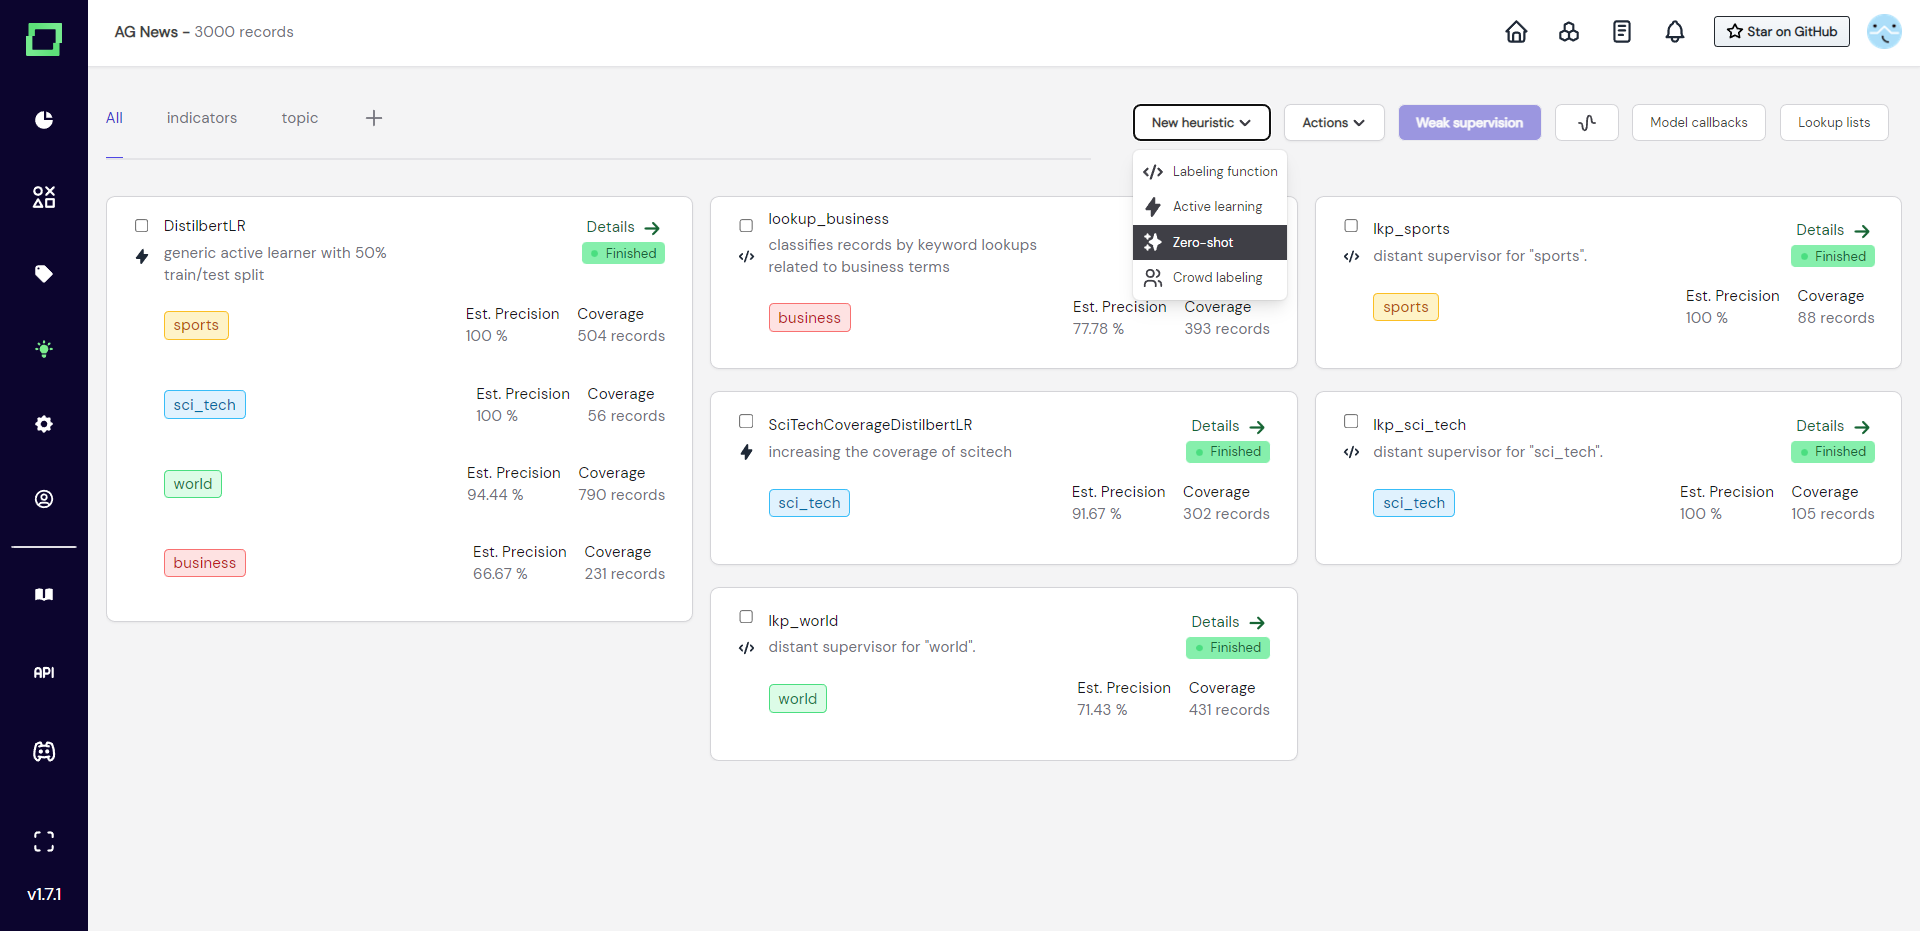
Just like the other heuristics, we can add a zero-shot classifier by visiting the heuristic overview page and selecting "zero-shot" in the "new heuristic" dropdown menu.
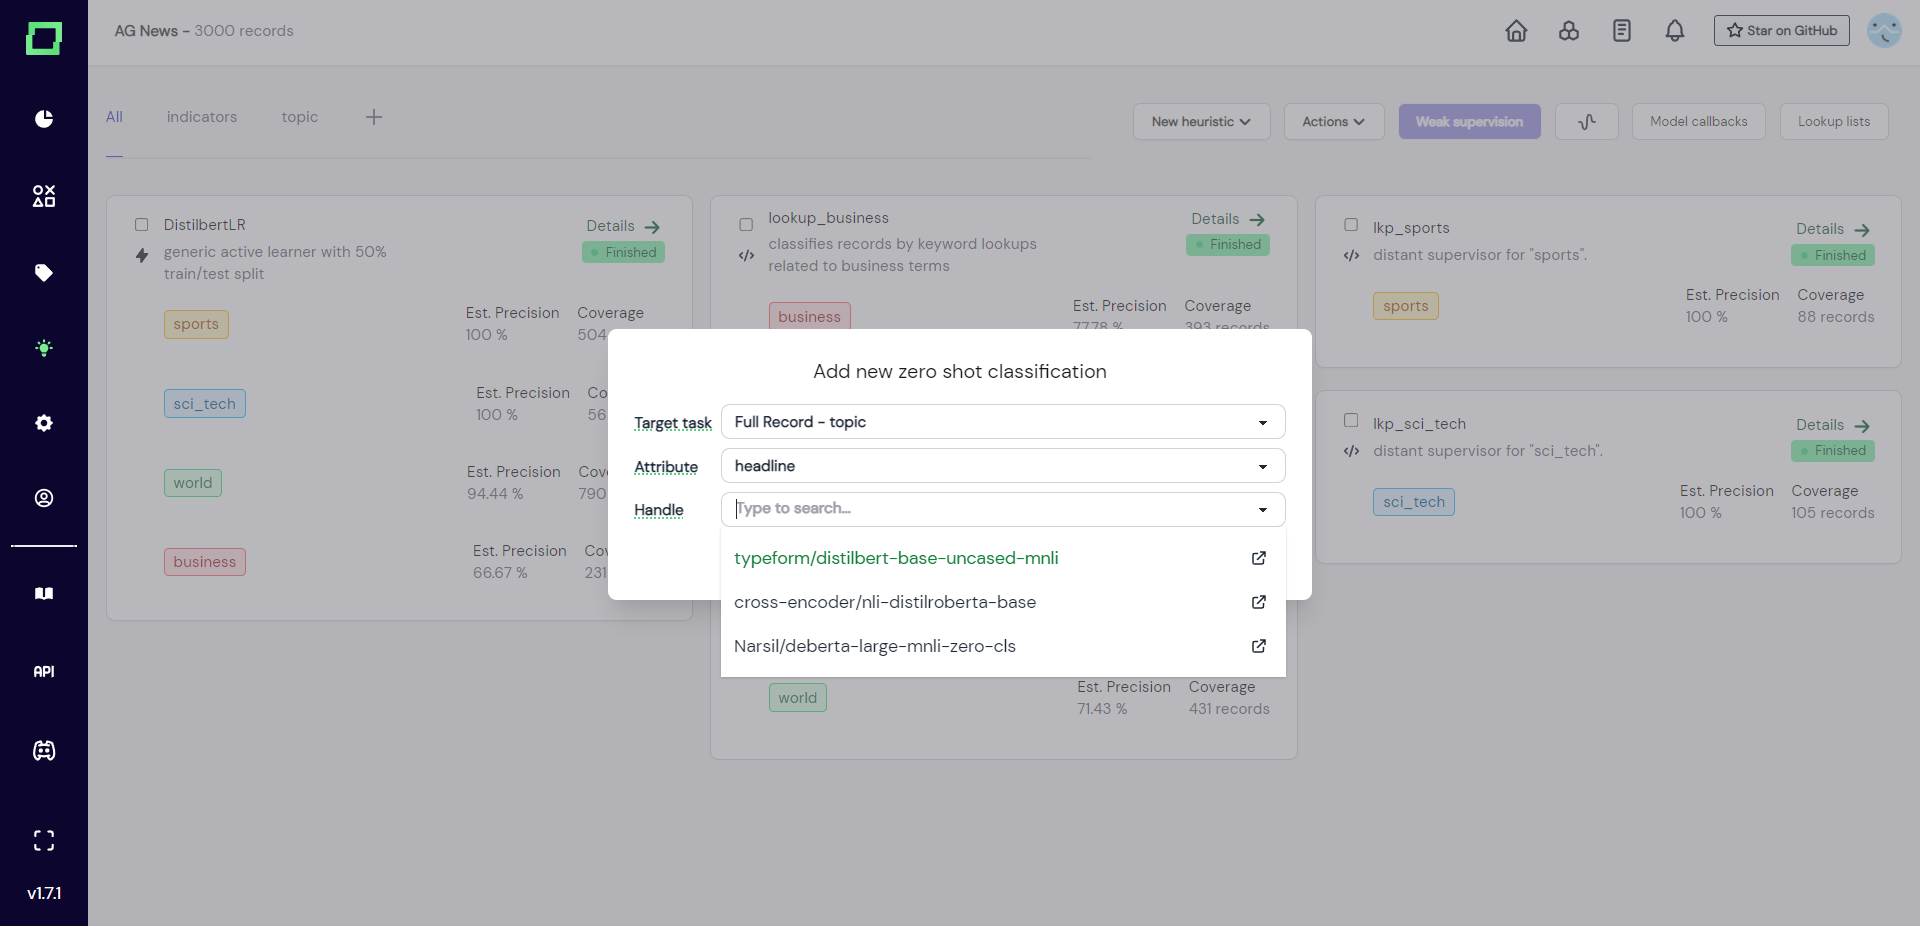
The information we then have to fill out (see Fig. 2) is pretty straightforward. Select the task and attribute, then input a handle from Hugging Face. Make sure that the Hugging Face model is suitable for zero-shot classification. You can browse the available models here.
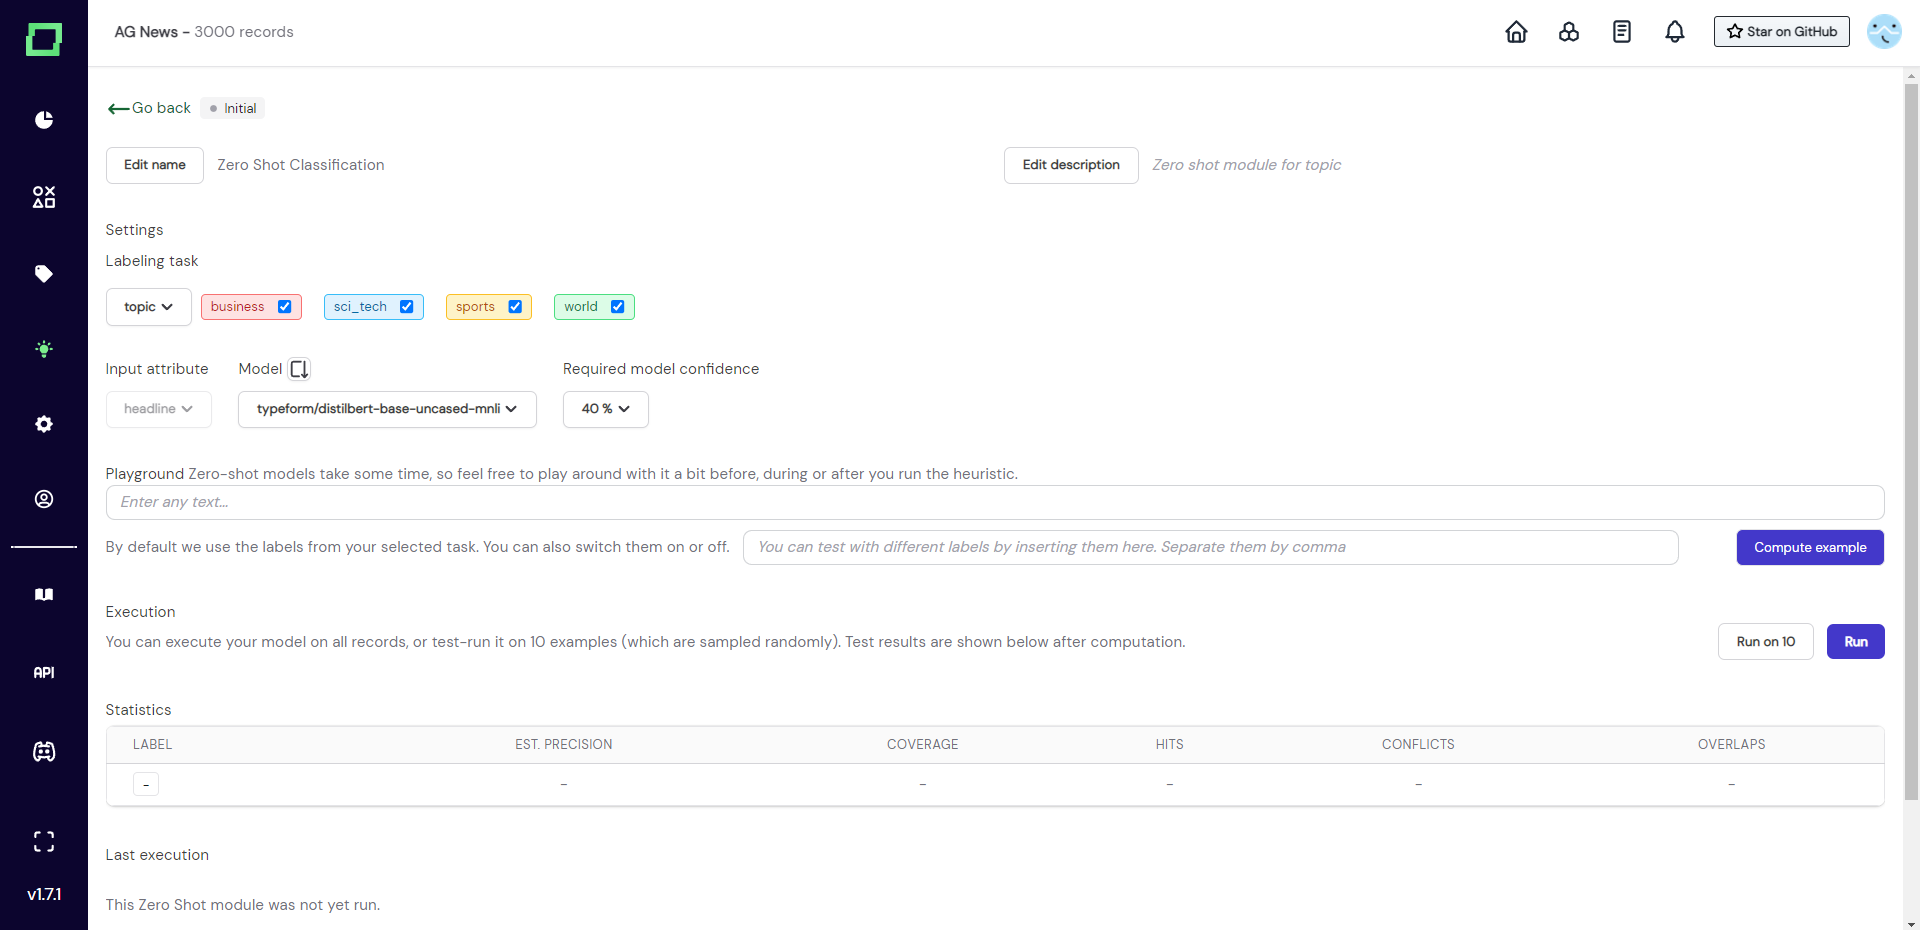
After creation, you are redirected to the details page of the zero-shot classifier (see Fig. 3).
Experimenting with the zero-shot classifier
In theory, you could run this classifier out of the box with the default configuration by just clicking on the "run" button. But there are a few things one should keep in mind for optimal performance. As this classifier is really relying on the wording of the labels for classification, you should first make sure that the label names are expressive. If a label is called yes, then it does not carry any information for this zero-shot module even though it might totally make sense for a human labeler in combination with the name of the labeling task. For example, consider renaming yes to clickbait headline if it is a clickbait labeling task.
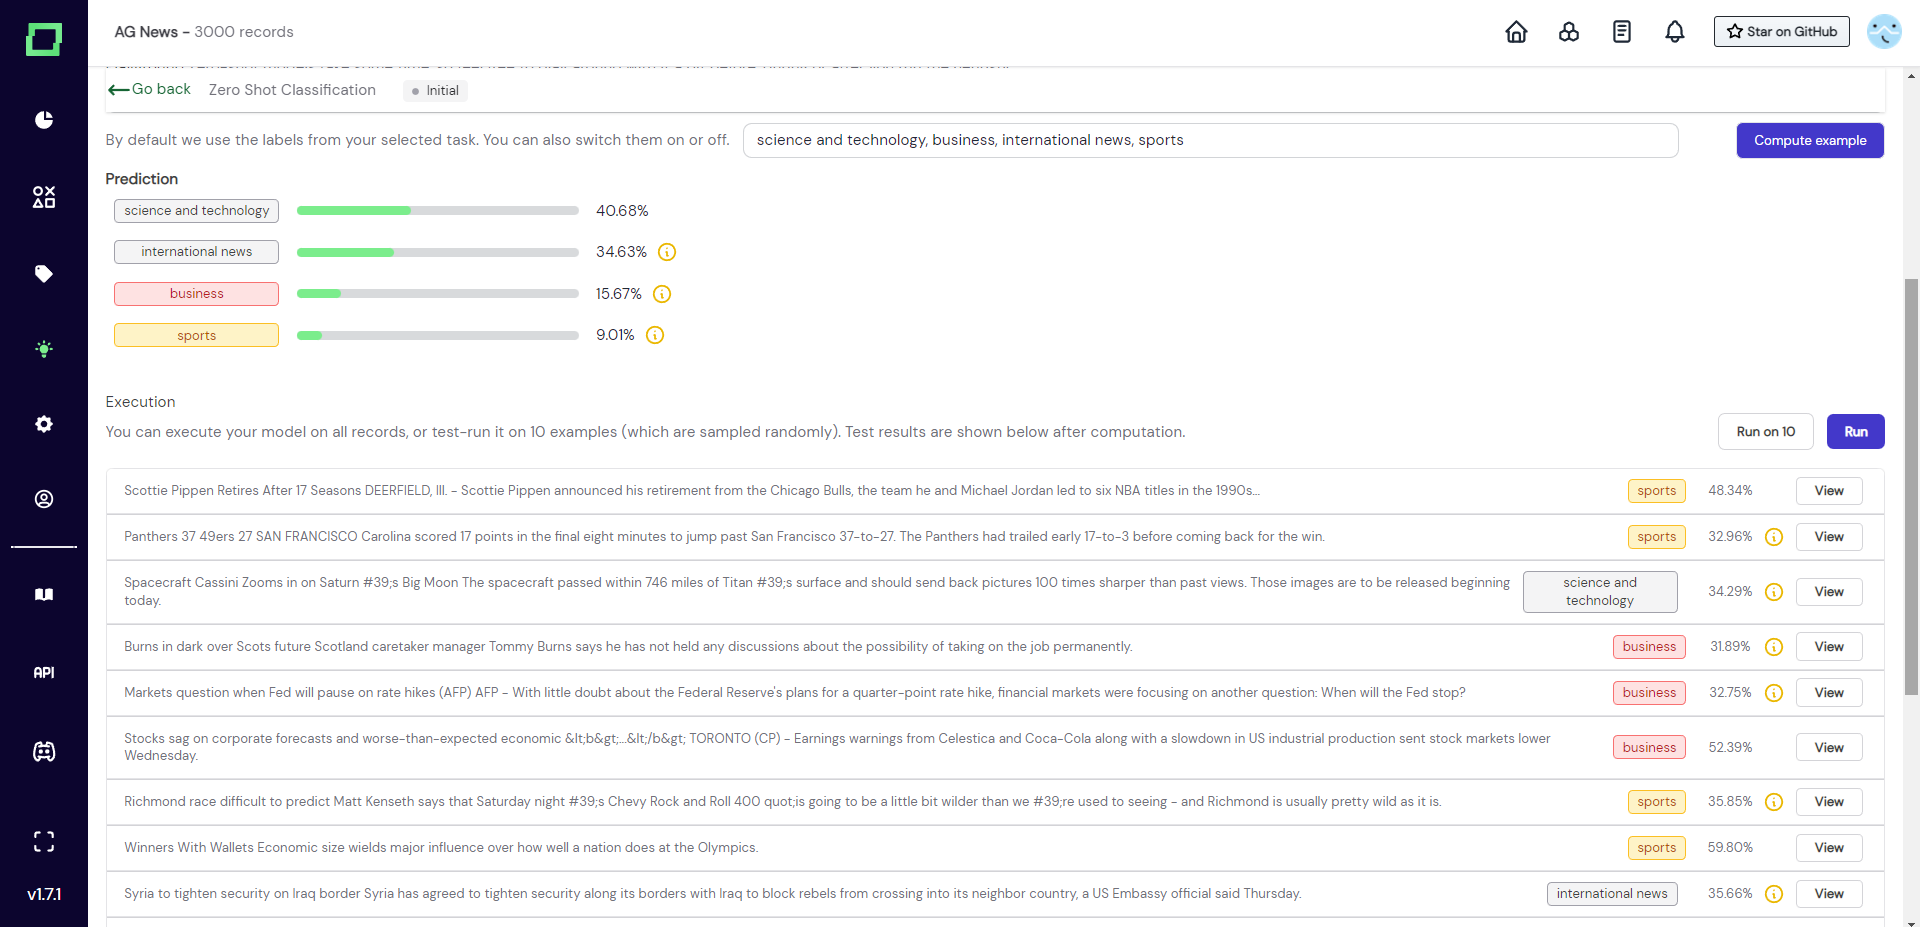
Because this module requires a little experimentation, refinery gives you the tools to try out a lot of variations. The first thing is the "run on 10" feature, which is common among the heuristics. It samples 10 random records from your data and executes the classifier on them.
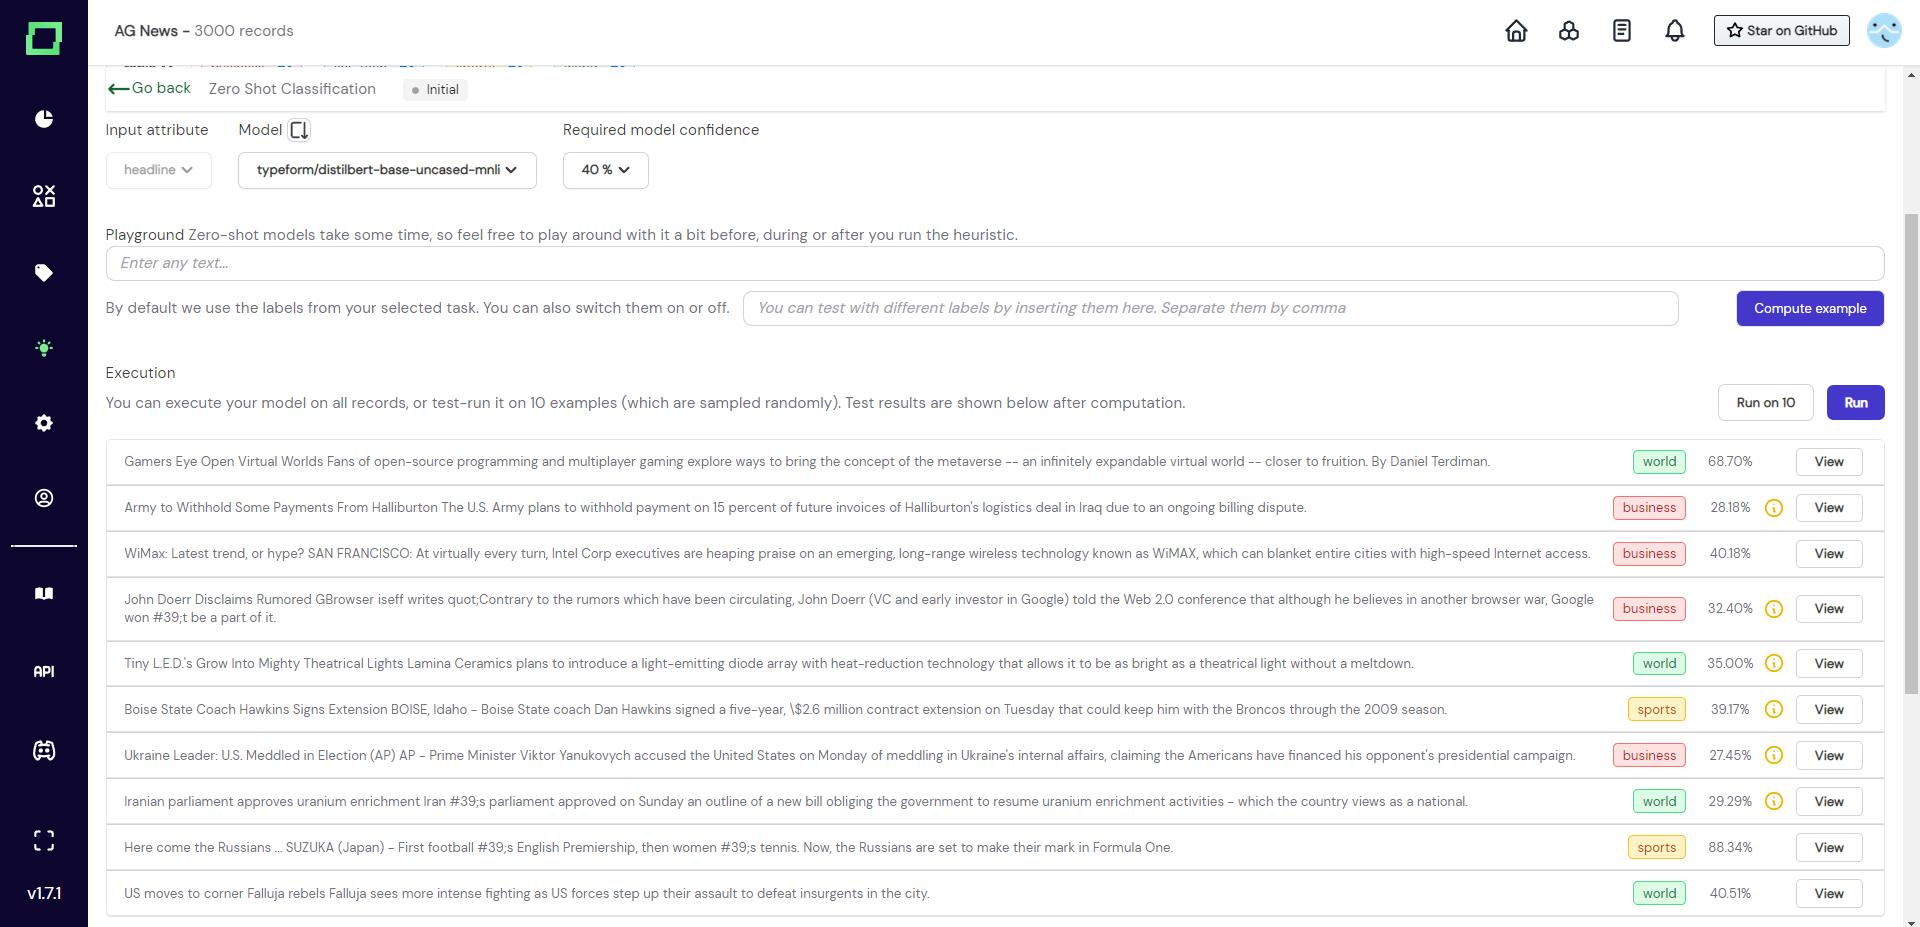
After running the classifier on 10 samples, we can inspect the results in the table below (see Fig. 4). All the yellow exclamation marks indicate that these records are below the prediction threshold that was set further up on this page (a good default is 40 %).
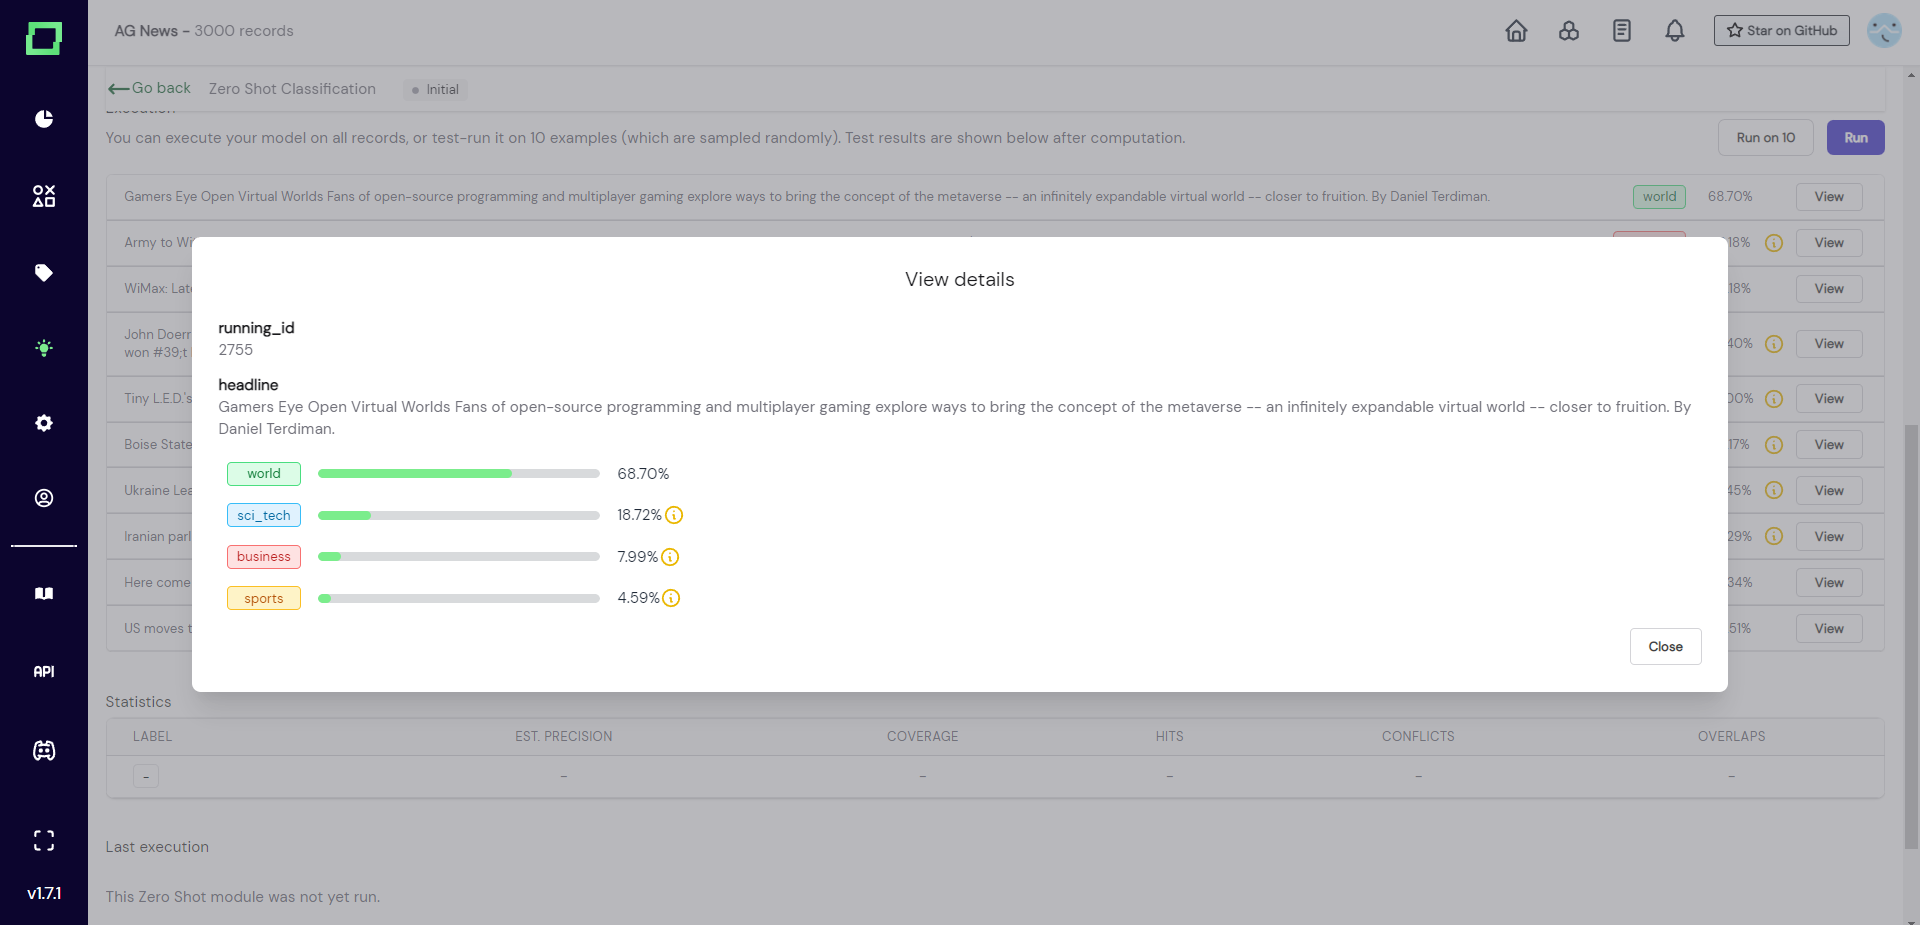
When inspecting these results (Fig. 4), we can see that the first entry was predicted to carry the label world. If we read the headline carefully, we might get an idea why that could have been:
Gamers Eye Open Virtual Worlds Fans of open-source programming and multiplayer gaming explore ways to bring the concept of the metaverse -- an infinitely expandable virtual
world-- closer to fruition. By Daniel Terdiman.
If we now click on the "view" button next to the label, we get the full details of that record and prediction (see Fig. 5). The classifier lists sci_tech as the second most probably option, which would be the correct label, but apparently sci_tech is not expressive enough (overall, it is not even a real world) and world expresses the wrong concept, even though we humans might be able to use a better abstraction of it.
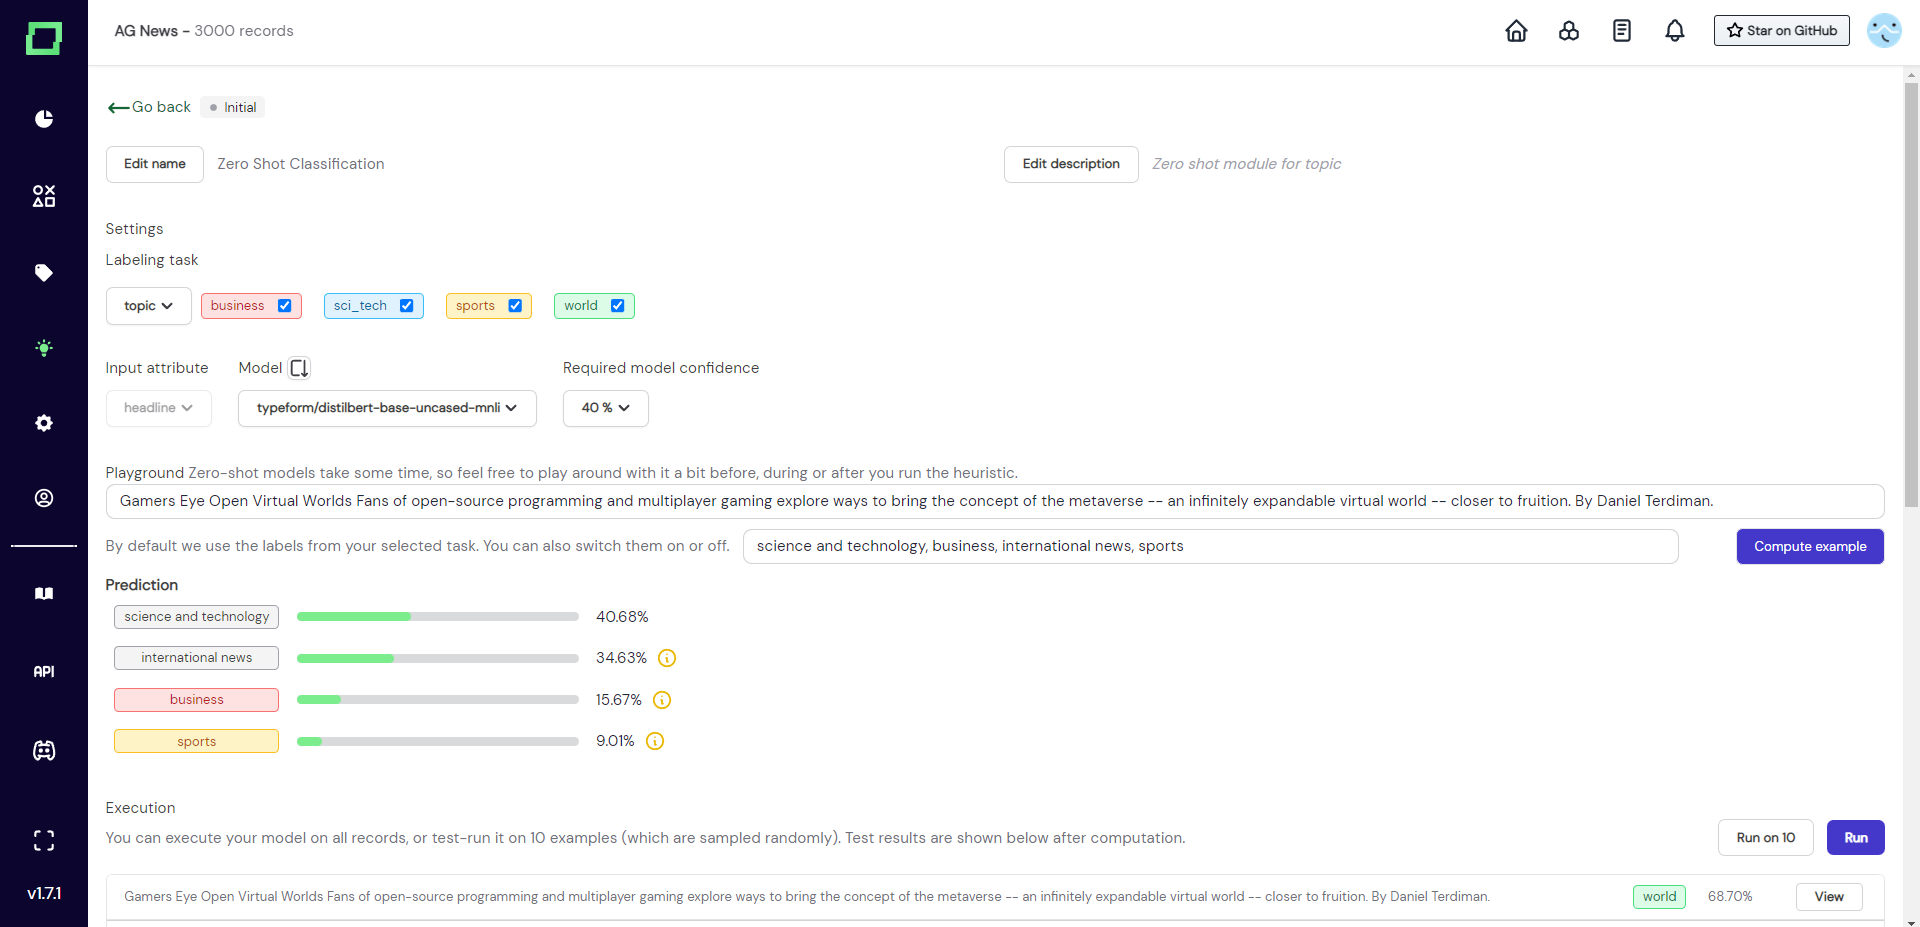
In order to prototype better label descriptions, we can use the zero-shot playground on this details page. For that, we just insert the text we want to classify into the first textbox and put the new label names into the textbox below (comma separated). We then press "compute example", which returns the probabilities of the new label names. This has been done in Fig. 6, where the user replaced sci_tech with science and technology and replaced world with international news. The assigned label is now the correct one with a better-looking probability distribution.
If you like the new label names and want to test them on more data, you can now use the "run on 10" feature with these new label names. Just leave them entered in the textbox and press "run on 10". This way you get a better overview, which helps you further identify potential issues. But don't get lost in this iterative process. In the end, the zero-shot classifier is just a single imperfect heuristic in a whole collection of other heuristics.
Running a zero-shot classifier
Running the zero-shot classifier will only consider those labels whose boxes are checked at the top of the details page. So if you need to make final adjustments to the names of your labels, you need to head over to the settings page and change them before running this heuristic.
If you want to exclude some labels, because they are used more as flags instead of labels (e.g. can be deleted? or needs clarification), then make sure that they are unchecked before running the heuristic.
Finally, if everything is ready, you just have to click on "run" and the heuristic will be executed on all of your records. All predictions that don't surpass the set threshold are dropped.
Deleting a zero-shot classifier
You can delete the zero-shot classifier by scrolling to the very bottom of its details page and clicking on the delete button. This will remove all predictions of this heuristic, but won't change the weak supervision results that were calculated prior to the deletion.
Alternatively, you could go to the heuristics overview page, select the classifier, and then press on "actions" -> "delete selected". This will result in the same action.
Examples and best practices
Validation
After running your zero-shot classifier on the whole dataset, you get statistics describing its performance. The statistics should be used as an indicator of the quality of the classifier. Make sure to understand those statistics and follow best practices in evaluating heuristics.
Crowd labeling
This feature is only available in the managed version.
When you have some annotation budget available or just know some colleagues who have a little less domain expertise than required, you can still incorporate their knowledge as a crowd labeling heuristic. Before starting with this, you should be aware of the implications of this design choice. As this is only a heuristic, you will not be able to use these labels individually, but only in an aggregated form by incorporating them in the weak supervision process.
Pre-requisites
Before you can use the crowd labeling heuristic, you should first create static data slices that the annotators will work on. If you want to randomly distribute work, we suggest slicing your data according to the primary key (e.g. running_id), shuffling it randomly, and saving that to a slice.
You should also have at least one user with the annotator role assigned to your workspace. If that is not the case, get in contact with us and we will set it up together with you.
Creating a crowd labeling heuristic
As with every heuristic, we start by visiting the heuristics page and selecting "crowd labeling" in the dropdown "new heuristic".
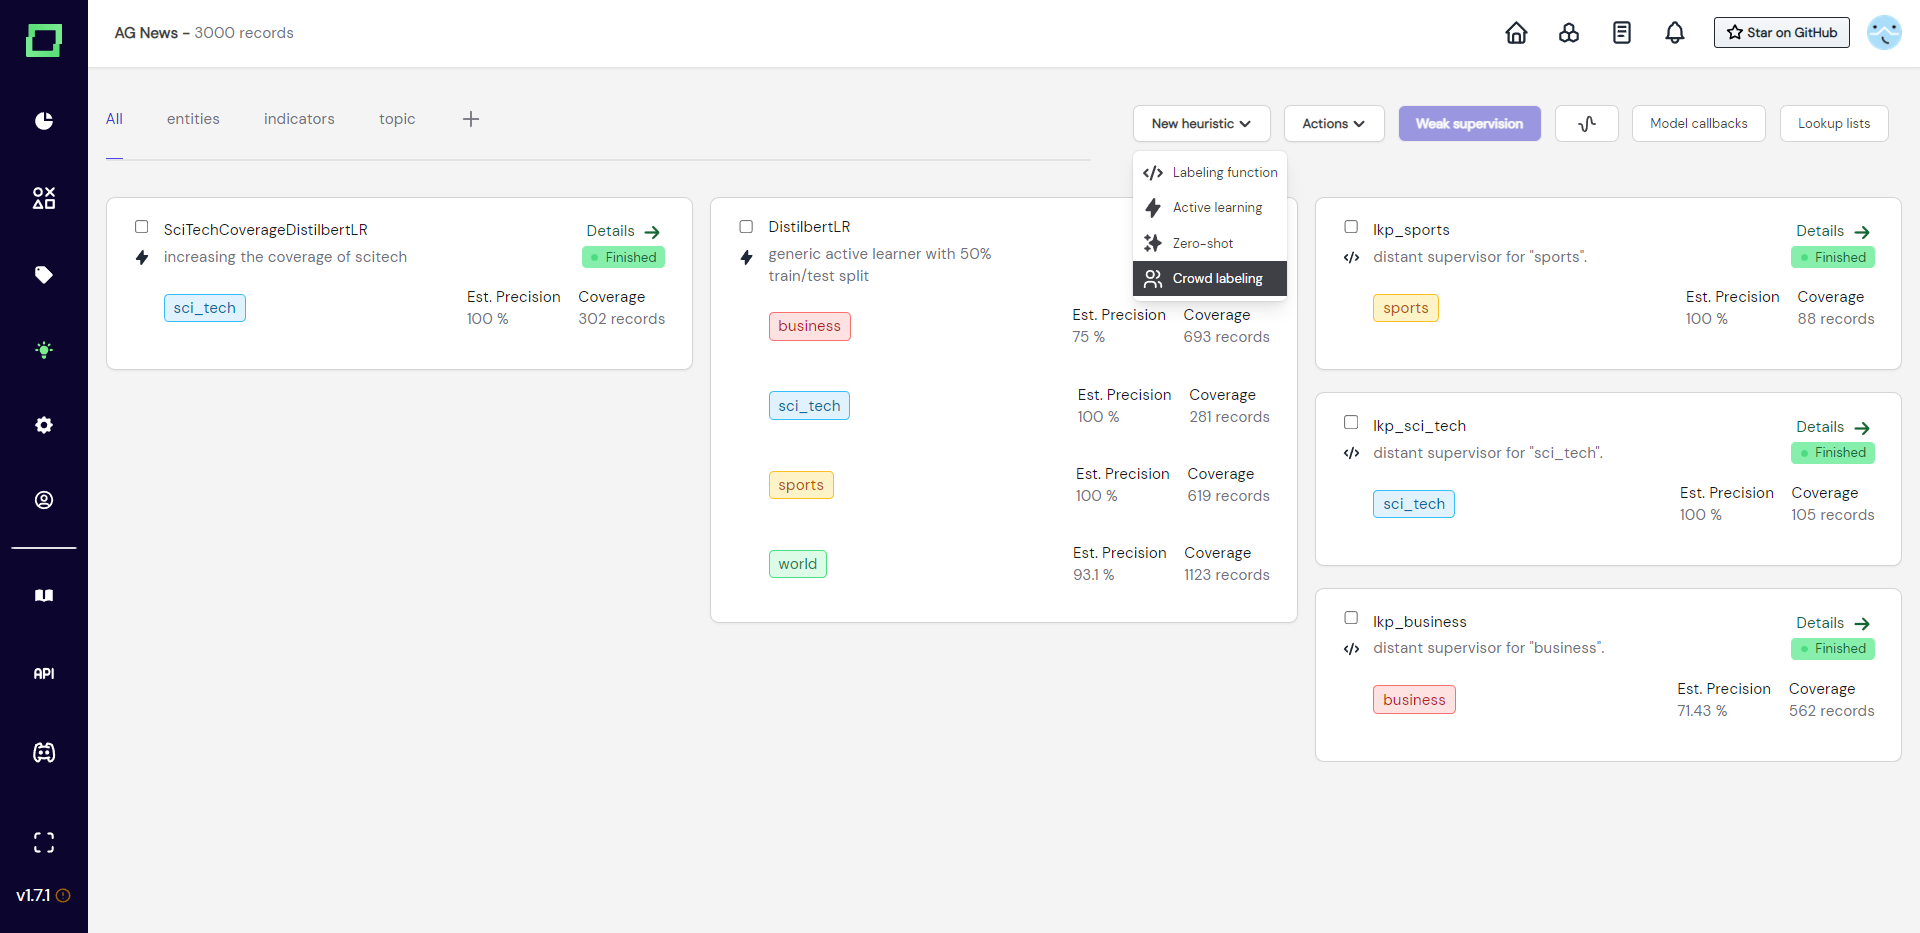
This heuristic also requires the user to specify the labeling task, a name, and a description. This can also still be updated in the next step.
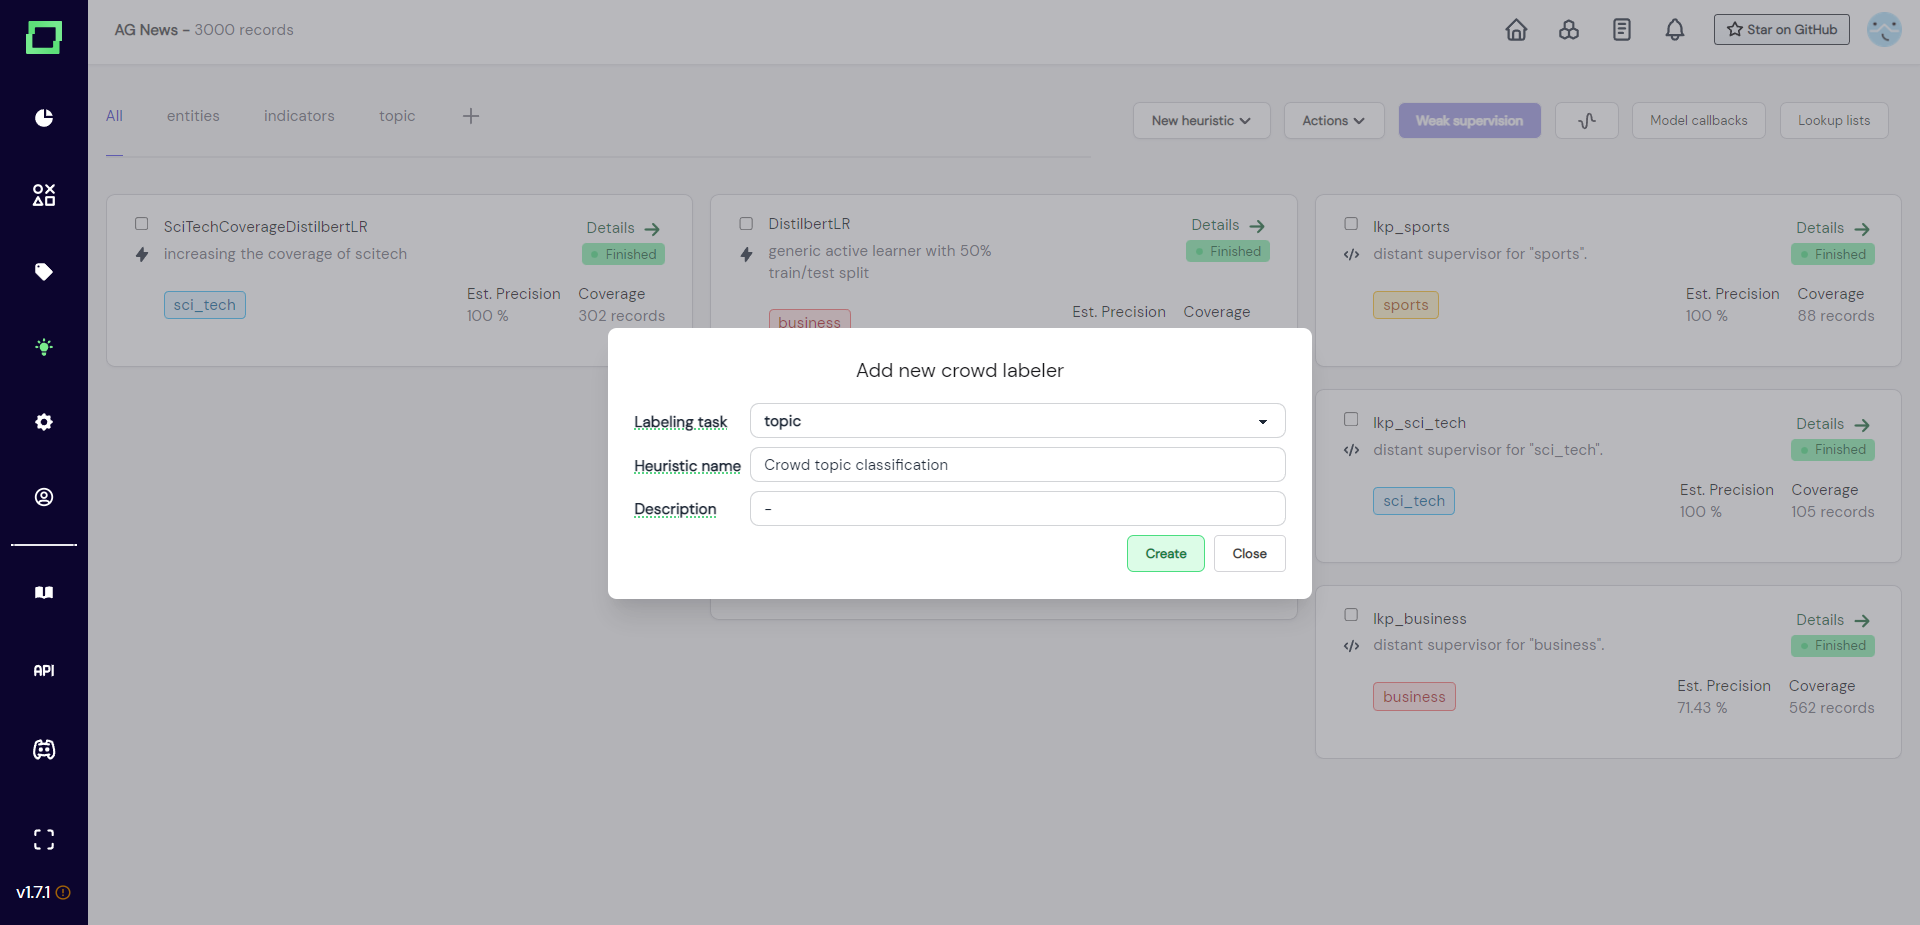
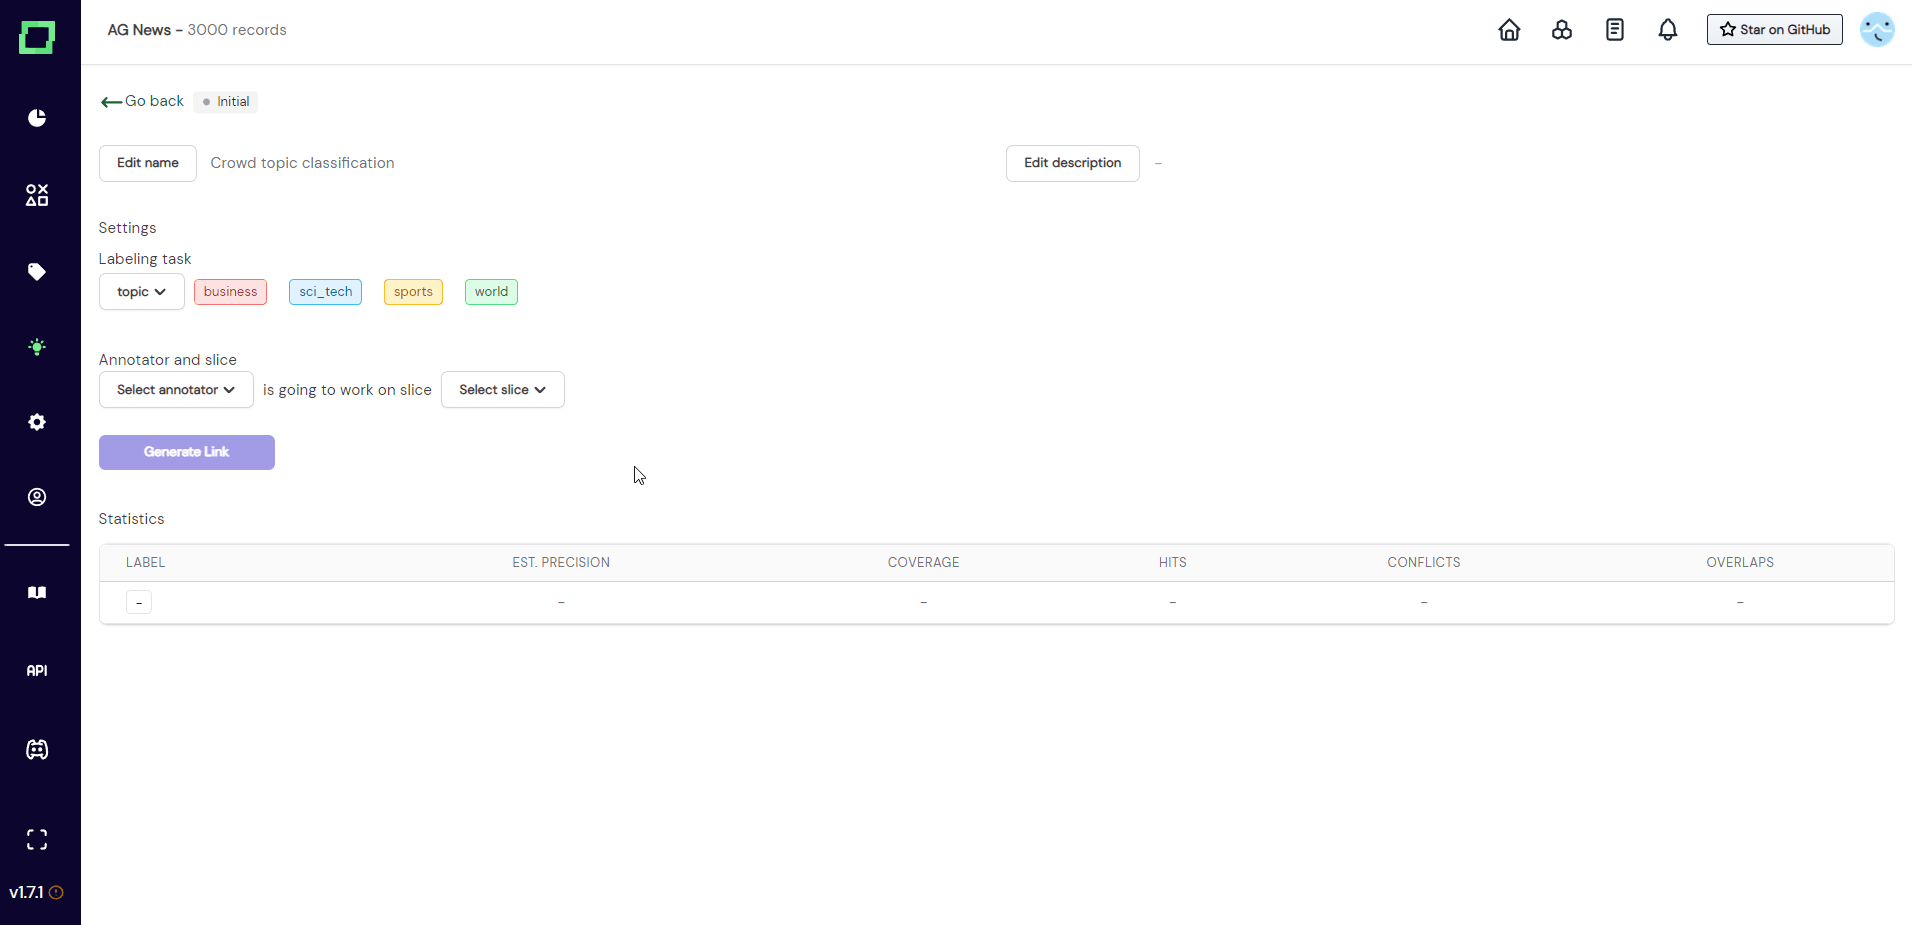
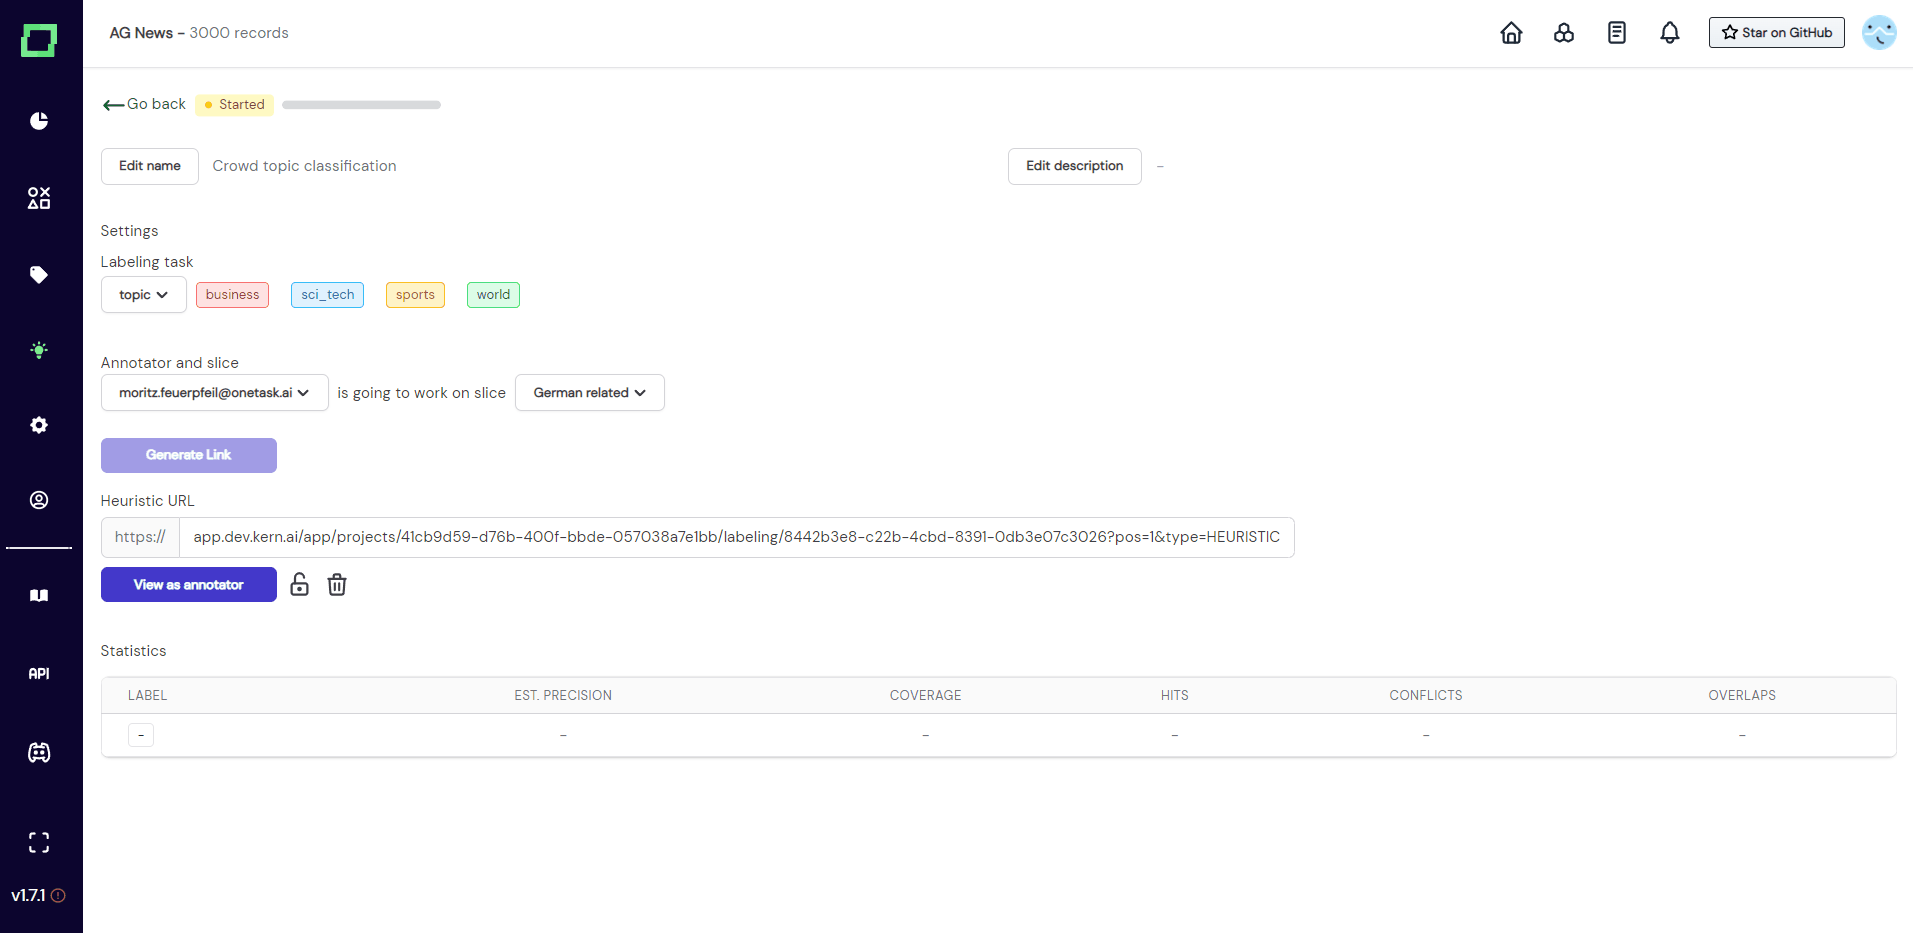
After you entered everything and clicked on "create", you will be redirected to the details page of that crowd heuristic. As you can see in Fig. 3, the state is still initial and there is no annotator or slice selected. You can now fill in the required information, so assign one annotator account to one static data slice. After that, you can generate a link that can be sent out to the annotator.
Distributing the labeling work
Before sending out any links, you should be sure that you selected the right labeling task, annotator, and data slice. As soon as one crowd label is assigned to this heuristic, these options will be locked and cannot be changed anymore.
Once you made sure everything is correct, you can just send the link out to the person that has access to the selected annotator account (e.g. send the link to [email protected] in the example of Fig. 3).
Want to revoke access to this heuristic but already sent out the link? Selecting the lock icon below the link will "lock" the annotator out of this heuristic, which means they won't be able to annotate or view the data anymore. This way you can revoke access to the data without deleting the heuristic.
As you can see in Fig. 4, as soon as the off-screen annotator set the first label, the settings get locked. The progress bar indicated the progress of the annotator on the selected slice. Statics are collected and live updated without refreshing the page. Read more on evaluating heuristics if you are curious about the meaning of the statistics.
Deleting a crowd labeling heuristic
Currently, there is no delete button on the crowd heuristic details page. That means the only way to delete this heuristic is by selecting it on the heuristic overview page and clicking on "actions" -> "delete selected".